> ## Documentation Index
> Fetch the complete documentation index at: https://docs.langbot.app/llms.txt
> Use this file to discover all available pages before exploring further.
# 插件开发教程
## 架构基础
在 4.0 版本中,我们引入了一种高安全性、高灵活性的生产级插件系统,并为插件开发者提供了丰富的 API 和易用的配套工具。
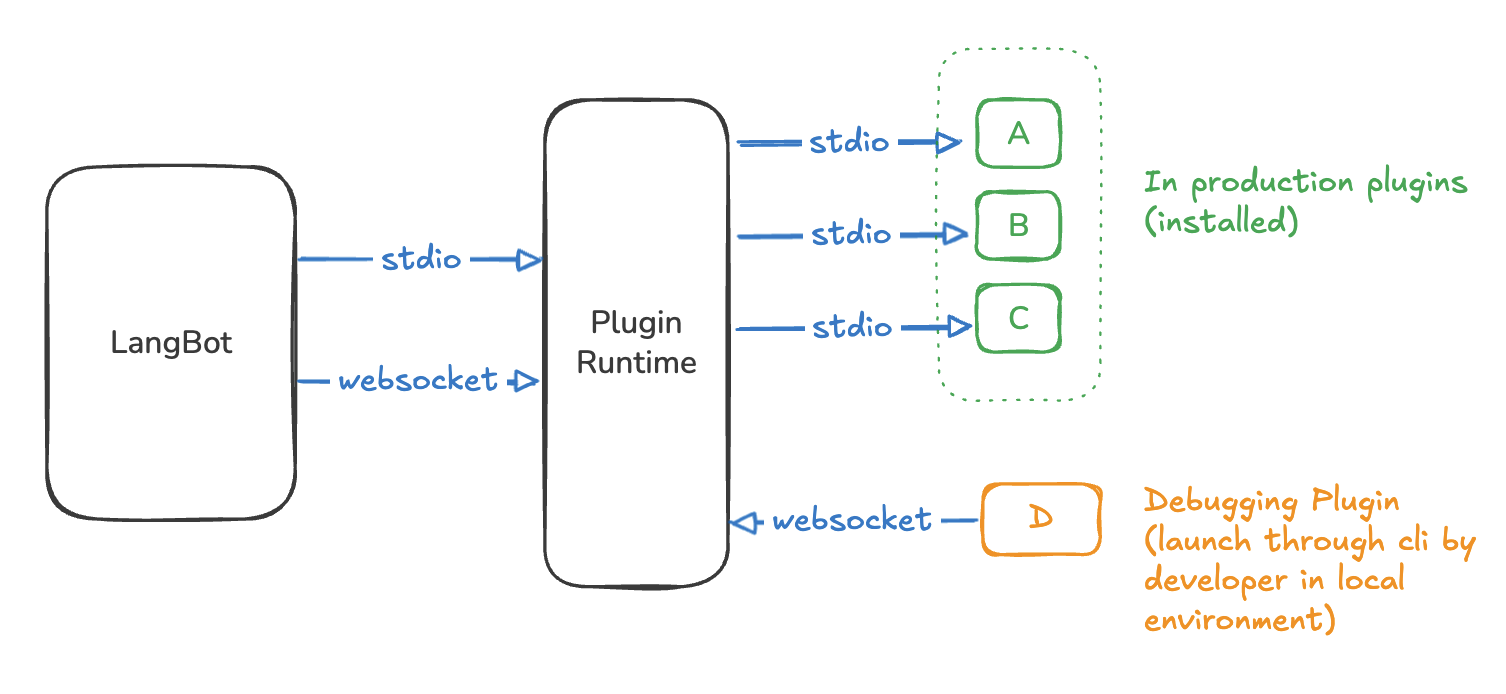 Plugin Runtime (插件运行时),用于管理插件的生命周期,协调 LangBot 与插件之间的交互。有两种运行模式:`stdio` 和 `websocket`。当 LangBot 是由用户直接启动(未运行在容器内时),会使用 `stdio` 模式,这种场景多为个人用户或轻量级环境。当 LangBot 运行在容器内时,会使用 `websocket` 模式,此场景专为生产级环境设计。
Plugin Runtime 会自动启动各个已安装的插件,通过 stdio 交互。在插件开发场景中,开发者可以使用 `lbp` 命令行工具启动插件并通过 WebSocket 连接到已启动的 Runtime 进行调试。
### 插件结构
一个插件的目录结构与以下类似:
```bash theme={null}
➜ HelloPlugin > tree
.
├── assets
│ └── icon.svg # 插件图标,会被展示在插件市场页面
├── components # 插件组件目录,存放插件的各个组件代码和清单文件
│ ├── __init__.py
│ ├── commands
│ │ ├── __init__.py
│ │ ├── info.py
│ │ └── info.yaml
│ ├── event_listener
│ │ ├── __init__.py
│ │ ├── default.py
│ │ └── default.yaml
│ └── tools
│ ├── __init__.py
│ ├── get_weather_alerts.py
│ └── get_weather_alerts.yaml
├── main.py # 插件主程序,监听插件的生命周期
├── manifest.yaml # 插件清单文件,描述插件的元信息
├── README.md # 插件说明文件,描述插件的功能和使用方法,会被展示在插件市场页面
├── readme
│ └── README_zh_Hans.md # 中文说明文件,用于多语言文档
├── requirements.txt # 插件依赖文件
└── .github
└── workflows
└── release.yml # GitHub Actions 工作流,推送版本号变更时自动构建并发布 Release
```
main.py 中的插件类是每个插件通用的代码,在插件被启动时会被初始化,并传入上下文信息(配置信息等)。您可在此实现插件的初始化和关闭时的逻辑。插件类会继承于`langbot_plugin.api.definition.plugin.BasePlugin`,并提供 [LangBot 全局 API](/zh/plugin/dev/apis/common)。
各个组件是您插件的核心功能模块,可以根据需要[添加和删除组件](/zh/plugin/dev/components/add)。不同的组件会在不同的情况下被调用,这种设计方便后续扩展插件功能。各个组件均直接继承于`langbot_plugin.api.definition.components`包下的各个组件基类,并在其中包含`plugin: BasePlugin`对象,您可直接调用插件的 API。
* 详细的 API 说明请参考[API 参考](/zh/plugin/dev/apis/common)。
请您继续阅读本页教程,了解插件的开发流程。
## AI 辅助开发
* [skills-LangBotplugin](https://github.com/TyperBody/skills-LangBotplugin) - 来自社区成员 [@TyperBody](https://github.com/TyperBody) 贡献的 Skills,使用 AI 快速开发插件,欢迎体验
* *langbotplugin* 该skill提供自动化生成插件工具
* *langbotplugindebug* 该skill提供调试插件工具
## 安装 CLI
请确保您已安装 Python 3.10 或更高版本,并已安装 [uv 包管理器](https://docs.astral.sh/uv/)。
在任意空目录执行命令,安装 LangBot CLI 和 SDK
```bash theme={null}
pip install -U langbot_plugin
```
## 初始化插件目录
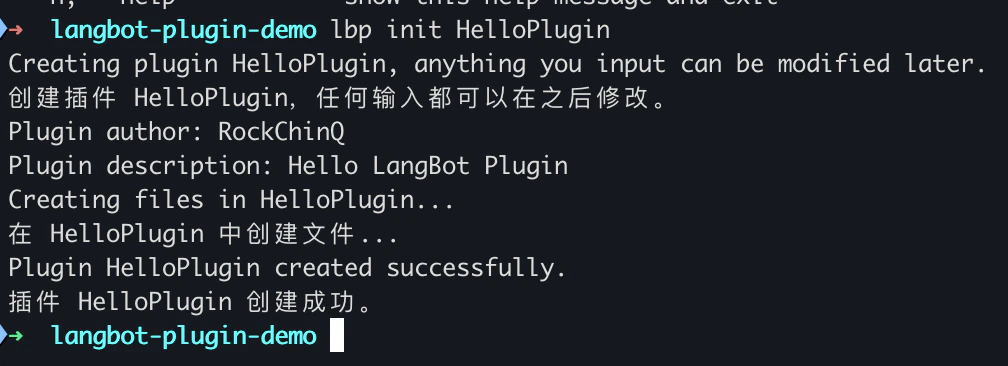
假设您的插件名称为 `HelloPlugin`,则在任意目录下创建目录`HelloPlugin`,并进入该目录,执行命令初始化插件:
```bash theme={null}
lbp init
```
按照提示输入`Author(作者)`、`Description(描述)`等信息
您也可以使用`lbp init HelloPlugin`命令,在子目录`HelloPlugin`中初始化插件。
Plugin Runtime (插件运行时),用于管理插件的生命周期,协调 LangBot 与插件之间的交互。有两种运行模式:`stdio` 和 `websocket`。当 LangBot 是由用户直接启动(未运行在容器内时),会使用 `stdio` 模式,这种场景多为个人用户或轻量级环境。当 LangBot 运行在容器内时,会使用 `websocket` 模式,此场景专为生产级环境设计。
Plugin Runtime 会自动启动各个已安装的插件,通过 stdio 交互。在插件开发场景中,开发者可以使用 `lbp` 命令行工具启动插件并通过 WebSocket 连接到已启动的 Runtime 进行调试。
### 插件结构
一个插件的目录结构与以下类似:
```bash theme={null}
➜ HelloPlugin > tree
.
├── assets
│ └── icon.svg # 插件图标,会被展示在插件市场页面
├── components # 插件组件目录,存放插件的各个组件代码和清单文件
│ ├── __init__.py
│ ├── commands
│ │ ├── __init__.py
│ │ ├── info.py
│ │ └── info.yaml
│ ├── event_listener
│ │ ├── __init__.py
│ │ ├── default.py
│ │ └── default.yaml
│ └── tools
│ ├── __init__.py
│ ├── get_weather_alerts.py
│ └── get_weather_alerts.yaml
├── main.py # 插件主程序,监听插件的生命周期
├── manifest.yaml # 插件清单文件,描述插件的元信息
├── README.md # 插件说明文件,描述插件的功能和使用方法,会被展示在插件市场页面
├── readme
│ └── README_zh_Hans.md # 中文说明文件,用于多语言文档
├── requirements.txt # 插件依赖文件
└── .github
└── workflows
└── release.yml # GitHub Actions 工作流,推送版本号变更时自动构建并发布 Release
```
main.py 中的插件类是每个插件通用的代码,在插件被启动时会被初始化,并传入上下文信息(配置信息等)。您可在此实现插件的初始化和关闭时的逻辑。插件类会继承于`langbot_plugin.api.definition.plugin.BasePlugin`,并提供 [LangBot 全局 API](/zh/plugin/dev/apis/common)。
各个组件是您插件的核心功能模块,可以根据需要[添加和删除组件](/zh/plugin/dev/components/add)。不同的组件会在不同的情况下被调用,这种设计方便后续扩展插件功能。各个组件均直接继承于`langbot_plugin.api.definition.components`包下的各个组件基类,并在其中包含`plugin: BasePlugin`对象,您可直接调用插件的 API。
* 详细的 API 说明请参考[API 参考](/zh/plugin/dev/apis/common)。
请您继续阅读本页教程,了解插件的开发流程。
## AI 辅助开发
* [skills-LangBotplugin](https://github.com/TyperBody/skills-LangBotplugin) - 来自社区成员 [@TyperBody](https://github.com/TyperBody) 贡献的 Skills,使用 AI 快速开发插件,欢迎体验
* *langbotplugin* 该skill提供自动化生成插件工具
* *langbotplugindebug* 该skill提供调试插件工具
## 安装 CLI
请确保您已安装 Python 3.10 或更高版本,并已安装 [uv 包管理器](https://docs.astral.sh/uv/)。
在任意空目录执行命令,安装 LangBot CLI 和 SDK
```bash theme={null}
pip install -U langbot_plugin
```
## 初始化插件目录
假设您的插件名称为 `HelloPlugin`,则在任意目录下创建目录`HelloPlugin`,并进入该目录,执行命令初始化插件:
```bash theme={null}
lbp init
```
按照提示输入`Author(作者)`、`Description(描述)`等信息
您也可以使用`lbp init HelloPlugin`命令,在子目录`HelloPlugin`中初始化插件。
 此操作将生成插件的初始文件。您现在可以在您喜爱的编辑器中打开 `HelloPlugin` 目录,开始编写插件代码。
若提示找不到 `lbp` 命令,可能是由于您未正确设置 `PATH` 环境变量。
可使用`python -m langbot_plugin.cli.__init__`替代`lbp`命令。
例如:
```bash theme={null}
python -m langbot_plugin.cli.__init__ init HelloPlugin
cd HelloPlugin
```
## 启动调试
您需要先部署并启动 LangBot,确保 Plugin Runtime 正在运行并监听 `5401` 端口。
* `Stdio` 模式:当您使用源代码启动 LangBot 并未携带启动参数`--standalone-runtime`时,LangBot 会自动以子进程的形式启动 Plugin Runtime,并通过 `stdio`(标准输入输出流)模式与 Plugin Runtime 通信。此时 Runtime 会加载 LangBot 根目录的`data/plugins`目录下的插件。并监听 LangBot 运行主机的`5401`端口作为调试端口。
* `WebSocket` 模式:
* 生产环境:当您使用官方提供的`docker-compose.yaml`启动 LangBot 时,会在独立的容器运行 Plugin Runtime,LangBot 也会因为携带启动参数`--standalone-runtime`而以 WebSocket 模式与 Plugin Runtime 通信。默认情况下,Runtime 容器的 5401 端口会被映射到宿主机的 5401 端口。
* 开发环境:若您通过源代码启动 LangBot,并携带启动参数`--standalone-runtime`,LangBot 按照`data/config.yaml`中配置的`plugin.runtime_ws_url`地址(端口通常是5400)连接到已启动的 Plugin Runtime。您需要自行启动独立运行的 Plugin Runtime,见[开发 Plugin Runtime](/zh/develop/plugin-runtime)。
无论是`stdio`或`websocket`模式,Plugin Runtime 都会监听其所在的主机的`5401`端口作为调试端口供插件调试时连接。
当您在开发插件时,推荐您按照[开发配置](/zh/develop/dev-config)中的方式 LangBot,此方式将以 Stdio 形式启动 Plugin Runtime,便于插件开发。
复制插件目录下的`.env.example`文件为`.env`,检查或修改`DEBUG_RUNTIME_WS_URL`为您的 Plugin Runtime 的 WebSocket 地址。
```bash theme={null}
cp .env.example .env
```
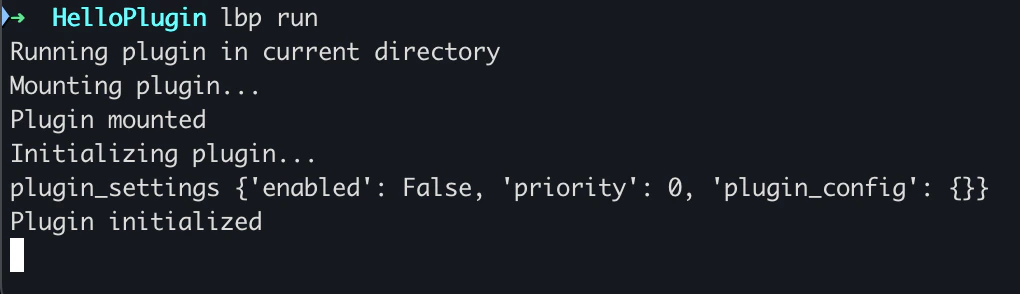
启动插件调试,您将看到插件的输出:
```bash theme={null}
lbp run
```
此操作将生成插件的初始文件。您现在可以在您喜爱的编辑器中打开 `HelloPlugin` 目录,开始编写插件代码。
若提示找不到 `lbp` 命令,可能是由于您未正确设置 `PATH` 环境变量。
可使用`python -m langbot_plugin.cli.__init__`替代`lbp`命令。
例如:
```bash theme={null}
python -m langbot_plugin.cli.__init__ init HelloPlugin
cd HelloPlugin
```
## 启动调试
您需要先部署并启动 LangBot,确保 Plugin Runtime 正在运行并监听 `5401` 端口。
* `Stdio` 模式:当您使用源代码启动 LangBot 并未携带启动参数`--standalone-runtime`时,LangBot 会自动以子进程的形式启动 Plugin Runtime,并通过 `stdio`(标准输入输出流)模式与 Plugin Runtime 通信。此时 Runtime 会加载 LangBot 根目录的`data/plugins`目录下的插件。并监听 LangBot 运行主机的`5401`端口作为调试端口。
* `WebSocket` 模式:
* 生产环境:当您使用官方提供的`docker-compose.yaml`启动 LangBot 时,会在独立的容器运行 Plugin Runtime,LangBot 也会因为携带启动参数`--standalone-runtime`而以 WebSocket 模式与 Plugin Runtime 通信。默认情况下,Runtime 容器的 5401 端口会被映射到宿主机的 5401 端口。
* 开发环境:若您通过源代码启动 LangBot,并携带启动参数`--standalone-runtime`,LangBot 按照`data/config.yaml`中配置的`plugin.runtime_ws_url`地址(端口通常是5400)连接到已启动的 Plugin Runtime。您需要自行启动独立运行的 Plugin Runtime,见[开发 Plugin Runtime](/zh/develop/plugin-runtime)。
无论是`stdio`或`websocket`模式,Plugin Runtime 都会监听其所在的主机的`5401`端口作为调试端口供插件调试时连接。
当您在开发插件时,推荐您按照[开发配置](/zh/develop/dev-config)中的方式 LangBot,此方式将以 Stdio 形式启动 Plugin Runtime,便于插件开发。
复制插件目录下的`.env.example`文件为`.env`,检查或修改`DEBUG_RUNTIME_WS_URL`为您的 Plugin Runtime 的 WebSocket 地址。
```bash theme={null}
cp .env.example .env
```
启动插件调试,您将看到插件的输出:
```bash theme={null}
lbp run
```
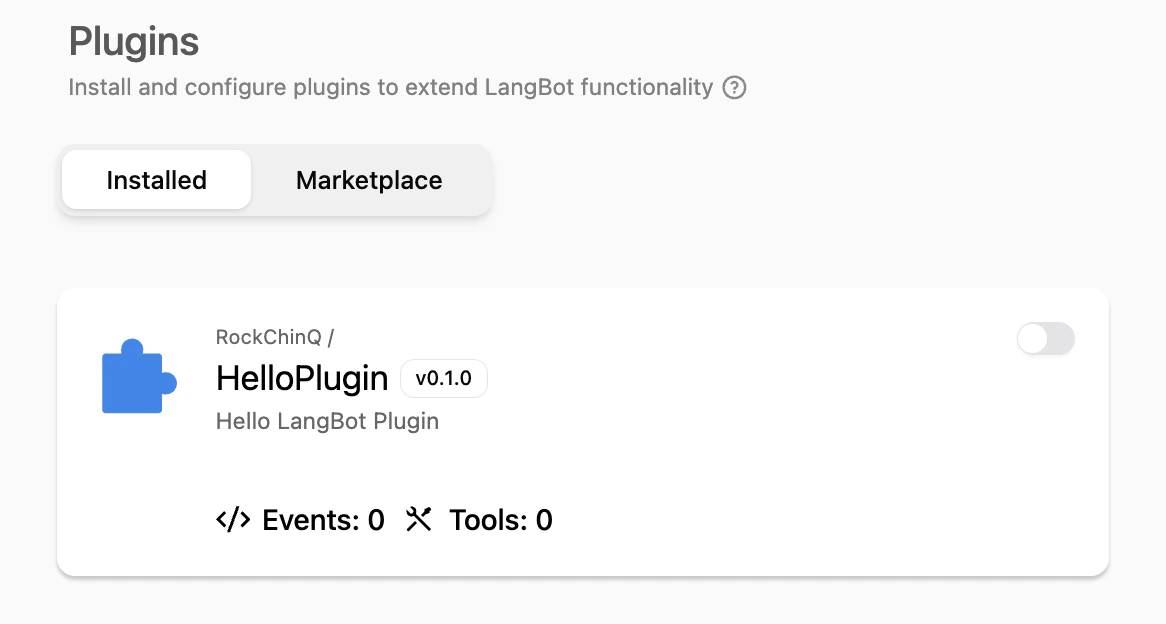
 并可以在 LangBot 的 WebUI 中看到此插件已被加载。
 ## 接下来做什么
该教程将指引您逐步完善插件功能。
* 修改插件信息:插件已创建,并填入了最基础的插件信息,请您[完善插件信息](/zh/plugin/dev/basic-info)。
* 添加组件:插件组件是插件的核心功能单元,您可以根据需求[添加组件](/zh/plugin/dev/components/add)。
## 接下来做什么
该教程将指引您逐步完善插件功能。
* 修改插件信息:插件已创建,并填入了最基础的插件信息,请您[完善插件信息](/zh/plugin/dev/basic-info)。
* 添加组件:插件组件是插件的核心功能单元,您可以根据需求[添加组件](/zh/plugin/dev/components/add)。