> ## Documentation Index
> Fetch the complete documentation index at: https://docs.langbot.app/llms.txt
> Use this file to discover all available pages before exploring further.
# 组件:命令
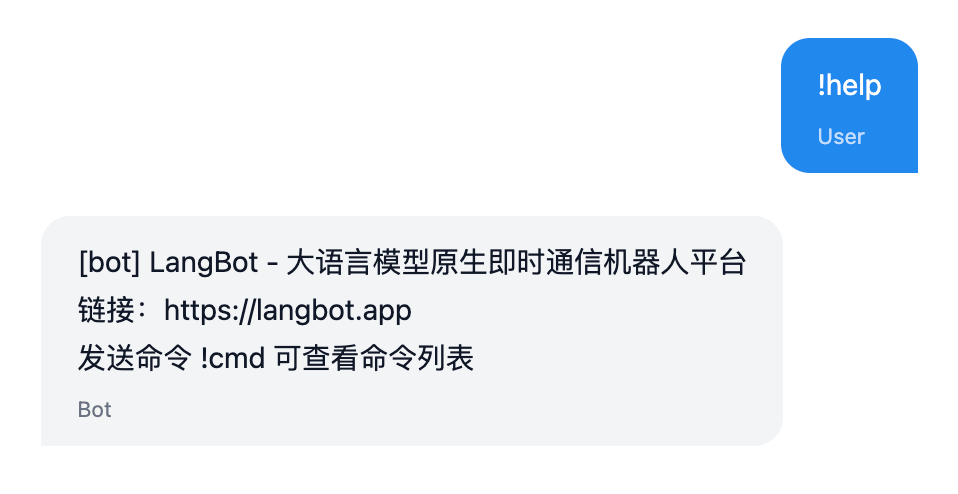
命令组件由用户通过`!`(或其他已设置的前缀)开头的命令消息触发。如下是命令`!help`的触发示例:
 ## 添加命令组件
单个插件中能添加任意数量的命令,请在插件目录执行命令`lbp comp Command`,并根据提示输入命令的配置。
```bash theme={null}
➜ HelloPlugin > lbp comp Command
Generating component Command...
Command name: info
Command description: Show information of the query
Component Command generated successfully.
组件 Command 生成成功。
```
现在即会在`components/commands/`目录下生成`info.yaml`和`info.py`文件,`.yaml`定义了`!info`命令的基础信息,`.py`是该命令的处理程序:
```bash theme={null}
➜ HelloPlugin > tree
...
├── components
│ ├── __init__.py
│ ├── commands
│ │ ├── __init__.py
│ │ ├── info.py
│ │ └── info.yaml
...
```
## 清单文件:命令组件
```yaml theme={null}
apiVersion: v1 # 请勿修改
kind: Command # 请勿修改
metadata:
name: info # 命令名称,在使用时,用户会通过 !info 触发该命令
label: # 命令显示名称,用于显示在 LangBot 的 UI 上,支持多语言
en_US: Info
zh_Hans: Info
description: # 命令描述,用于显示在 LangBot 的 UI 上,支持多语言。可选。
en_US: 'Show information of the query'
zh_Hans: '发送此次消息的详细信息'
spec:
execution:
python:
path: info.py # 命令处理程序,请勿修改
attr: Info # 命令处理程序的类名,与 info.py 中的类名一致
```
## 插件处理
默认会生成如下代码(`components/command/<命令名称>.py`),您需要在`Info`类的`initialize`方法中注册并实现子命令的处理逻辑。
```python theme={null}
# Auto generated by LangBot Plugin SDK.
# Please refer to https://docs.langbot.app/en/plugin/dev/tutor.html for more details.
from __future__ import annotations
from typing import Any, AsyncGenerator
from langbot_plugin.api.definition.components.command.command import Command, Subcommand
from langbot_plugin.api.entities.builtin.command.context import ExecuteContext, CommandReturn
class Info(Command):
async def initialize(self):
await super().initialize()
"Fill with your code here"
```
添加子命令:
```python theme={null}
...
class Info(Command):
async def initialize(self):
await super().initialize()
@self.subcommand(
name="", # 空字符串表示根命令
help="Show information of the query", # 命令帮助信息
usage="info", # 命令使用示例,显示在命令帮助信息中
aliases=["i"], # 命令别名
)
async def send(self, context: ExecuteContext) -> AsyncGenerator[CommandReturn, None]:
print(context)
reply_text = f"Query ID: {context.query_id}\n"
reply_text += f"command: {context.command}\n"
reply_text += f"command_text: {context.command_text}\n"
reply_text += f"params: {context.params}\n"
reply_text += f"crt_params: {context.crt_params}\n"
reply_text += f"privilege: {context.privilege}\n"
reply_text += f"session: {context.session.launcher_type.value}_{context.session.launcher_id}\n"
yield CommandReturn(
text=reply_text,
)
@self.subcommand(
name="field",
help="Show information of the field",
usage="info field",
aliases=["f"],
)
async def field(self, context: ExecuteContext) -> AsyncGenerator[CommandReturn, None]:
print(context)
field_name = context.crt_params[0]
field_value = getattr(context, field_name)
yield CommandReturn(
text=f"{field_name}: {field_value}",
)
```
该代码中,`send`函数通过装饰器`@self.subcommand`注册为子命令,并在其中打印了命令的上下文(ExecuteContext)信息并拼接成一条回复消息。
### 子命令注册
`name` 为子命令名称,留空表示处理主命令。不为空则匹配第二个参数为命令,例如:
* `!info` 匹配 name="" 的子命令
* `!info field` 匹配 name="field" 的子命令
* `!info field value` 匹配 name="field" 的子命令,`value` 为子命令参数
* 特殊地,`name="*"` 匹配所有未匹配的一级子命令,并将`info`后的每一节作为参数传递传递参数,例如`!info 123`, `!info abc`. 此时可以从`context.crt_params`中获取到`['123']`或`['abc']`,取决于用户输入的参数。
子命令函数中,可通过 `context` 变量读取到命令参数。
上述命令效果如图:
## 添加命令组件
单个插件中能添加任意数量的命令,请在插件目录执行命令`lbp comp Command`,并根据提示输入命令的配置。
```bash theme={null}
➜ HelloPlugin > lbp comp Command
Generating component Command...
Command name: info
Command description: Show information of the query
Component Command generated successfully.
组件 Command 生成成功。
```
现在即会在`components/commands/`目录下生成`info.yaml`和`info.py`文件,`.yaml`定义了`!info`命令的基础信息,`.py`是该命令的处理程序:
```bash theme={null}
➜ HelloPlugin > tree
...
├── components
│ ├── __init__.py
│ ├── commands
│ │ ├── __init__.py
│ │ ├── info.py
│ │ └── info.yaml
...
```
## 清单文件:命令组件
```yaml theme={null}
apiVersion: v1 # 请勿修改
kind: Command # 请勿修改
metadata:
name: info # 命令名称,在使用时,用户会通过 !info 触发该命令
label: # 命令显示名称,用于显示在 LangBot 的 UI 上,支持多语言
en_US: Info
zh_Hans: Info
description: # 命令描述,用于显示在 LangBot 的 UI 上,支持多语言。可选。
en_US: 'Show information of the query'
zh_Hans: '发送此次消息的详细信息'
spec:
execution:
python:
path: info.py # 命令处理程序,请勿修改
attr: Info # 命令处理程序的类名,与 info.py 中的类名一致
```
## 插件处理
默认会生成如下代码(`components/command/<命令名称>.py`),您需要在`Info`类的`initialize`方法中注册并实现子命令的处理逻辑。
```python theme={null}
# Auto generated by LangBot Plugin SDK.
# Please refer to https://docs.langbot.app/en/plugin/dev/tutor.html for more details.
from __future__ import annotations
from typing import Any, AsyncGenerator
from langbot_plugin.api.definition.components.command.command import Command, Subcommand
from langbot_plugin.api.entities.builtin.command.context import ExecuteContext, CommandReturn
class Info(Command):
async def initialize(self):
await super().initialize()
"Fill with your code here"
```
添加子命令:
```python theme={null}
...
class Info(Command):
async def initialize(self):
await super().initialize()
@self.subcommand(
name="", # 空字符串表示根命令
help="Show information of the query", # 命令帮助信息
usage="info", # 命令使用示例,显示在命令帮助信息中
aliases=["i"], # 命令别名
)
async def send(self, context: ExecuteContext) -> AsyncGenerator[CommandReturn, None]:
print(context)
reply_text = f"Query ID: {context.query_id}\n"
reply_text += f"command: {context.command}\n"
reply_text += f"command_text: {context.command_text}\n"
reply_text += f"params: {context.params}\n"
reply_text += f"crt_params: {context.crt_params}\n"
reply_text += f"privilege: {context.privilege}\n"
reply_text += f"session: {context.session.launcher_type.value}_{context.session.launcher_id}\n"
yield CommandReturn(
text=reply_text,
)
@self.subcommand(
name="field",
help="Show information of the field",
usage="info field",
aliases=["f"],
)
async def field(self, context: ExecuteContext) -> AsyncGenerator[CommandReturn, None]:
print(context)
field_name = context.crt_params[0]
field_value = getattr(context, field_name)
yield CommandReturn(
text=f"{field_name}: {field_value}",
)
```
该代码中,`send`函数通过装饰器`@self.subcommand`注册为子命令,并在其中打印了命令的上下文(ExecuteContext)信息并拼接成一条回复消息。
### 子命令注册
`name` 为子命令名称,留空表示处理主命令。不为空则匹配第二个参数为命令,例如:
* `!info` 匹配 name="" 的子命令
* `!info field` 匹配 name="field" 的子命令
* `!info field value` 匹配 name="field" 的子命令,`value` 为子命令参数
* 特殊地,`name="*"` 匹配所有未匹配的一级子命令,并将`info`后的每一节作为参数传递传递参数,例如`!info 123`, `!info abc`. 此时可以从`context.crt_params`中获取到`['123']`或`['abc']`,取决于用户输入的参数。
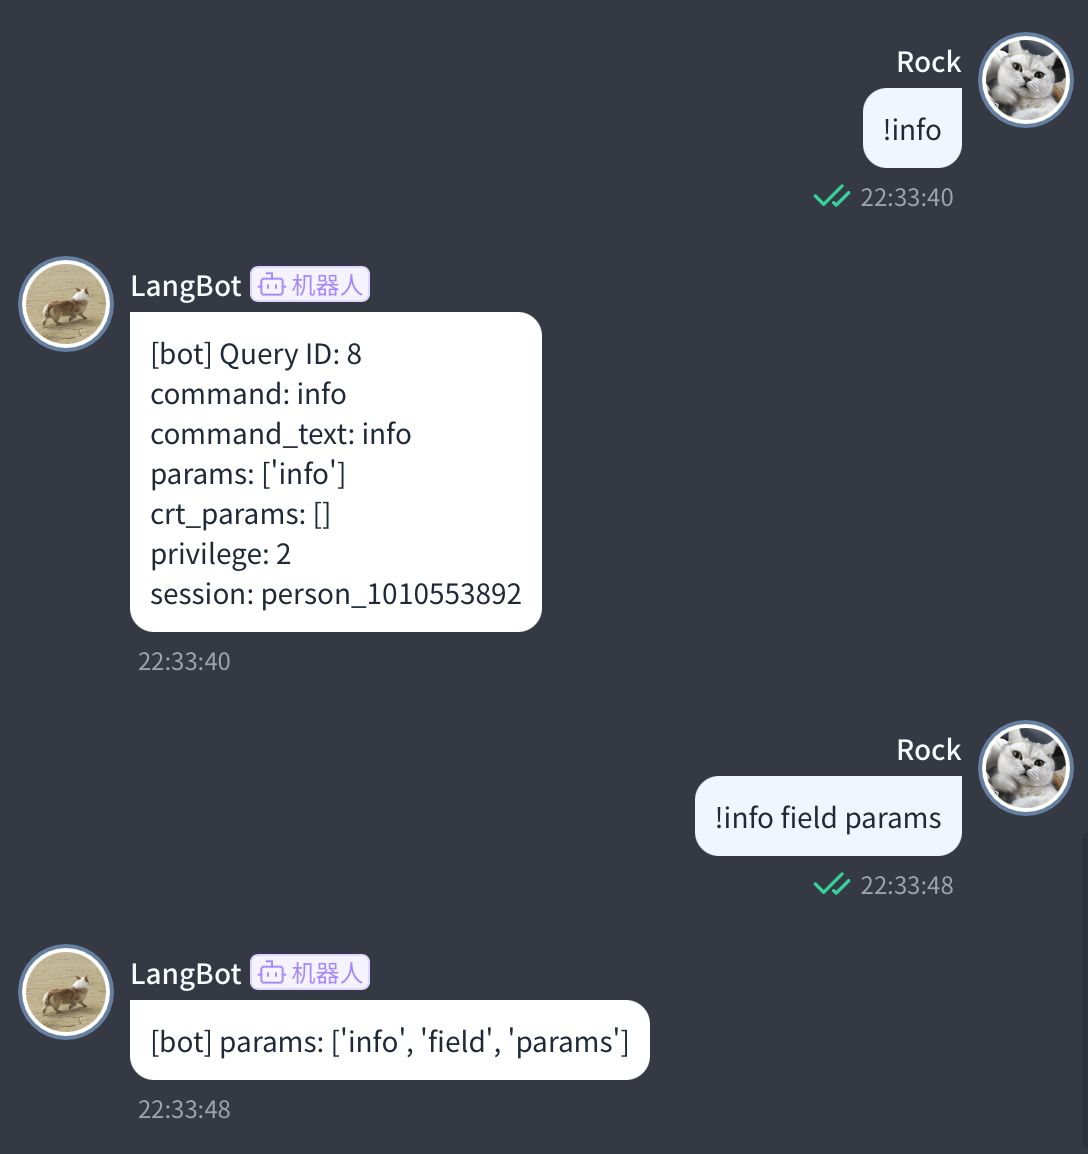
子命令函数中,可通过 `context` 变量读取到命令参数。
上述命令效果如图:
 ### 命令上下文
```python theme={null}
class ExecuteContext(pydantic.BaseModel):
"""单次命令执行上下文"""
query_id: int
"""请求ID"""
session: provider_session.Session
"""本次消息所属的会话对象"""
command_text: str
"""命令完整文本"""
command: str
"""命令名称"""
crt_command: str
"""当前命令
多级命令中crt_command为当前命令,command为根命令。
例如:!plugin on Webwlkr
处理到plugin时,command为plugin,crt_command为plugin
处理到on时,command为plugin,crt_command为on
"""
params: list[str]
"""命令参数
整个命令以空格分割后的参数列表
"""
crt_params: list[str]
"""当前命令参数
多级命令中crt_params为当前命令参数,params为根命令参数。
例如:!plugin on Webwlkr
处理到plugin时,params为['on', 'Webwlkr'],crt_params为['on', 'Webwlkr']
处理到on时,params为['on', 'Webwlkr'],crt_params为['Webwlkr']
"""
privilege: int
"""会话权限级别"""
...
```
### 命令返回值
命令返回值(CommandReturn)目前支持返回文本(text)和图片(image\_url,图片链接)、错误(error)。
```python theme={null}
yield CommandReturn(
text=reply_text,
)
yield CommandReturn(
image_url=image_url,
)
```
命令处理支持返回多条消息,故请使用`yield`语句返回消息。
具体的返回值请参考`CommandReturn`的定义:[langbot\_plugin.api.entities.builtin.command.context.CommandReturn](https://github.com/langbot-app/langbot-plugin-sdk/tree/main/src/langbot_plugin/api/entities/builtin/command/context.py)
## 接下来做什么
您已经了解了命令注册和命令执行的基本信息,接下来可以:
* 查看[插件通用 API](/zh/plugin/dev/apis/common)
### 命令上下文
```python theme={null}
class ExecuteContext(pydantic.BaseModel):
"""单次命令执行上下文"""
query_id: int
"""请求ID"""
session: provider_session.Session
"""本次消息所属的会话对象"""
command_text: str
"""命令完整文本"""
command: str
"""命令名称"""
crt_command: str
"""当前命令
多级命令中crt_command为当前命令,command为根命令。
例如:!plugin on Webwlkr
处理到plugin时,command为plugin,crt_command为plugin
处理到on时,command为plugin,crt_command为on
"""
params: list[str]
"""命令参数
整个命令以空格分割后的参数列表
"""
crt_params: list[str]
"""当前命令参数
多级命令中crt_params为当前命令参数,params为根命令参数。
例如:!plugin on Webwlkr
处理到plugin时,params为['on', 'Webwlkr'],crt_params为['on', 'Webwlkr']
处理到on时,params为['on', 'Webwlkr'],crt_params为['Webwlkr']
"""
privilege: int
"""会话权限级别"""
...
```
### 命令返回值
命令返回值(CommandReturn)目前支持返回文本(text)和图片(image\_url,图片链接)、错误(error)。
```python theme={null}
yield CommandReturn(
text=reply_text,
)
yield CommandReturn(
image_url=image_url,
)
```
命令处理支持返回多条消息,故请使用`yield`语句返回消息。
具体的返回值请参考`CommandReturn`的定义:[langbot\_plugin.api.entities.builtin.command.context.CommandReturn](https://github.com/langbot-app/langbot-plugin-sdk/tree/main/src/langbot_plugin/api/entities/builtin/command/context.py)
## 接下来做什么
您已经了解了命令注册和命令执行的基本信息,接下来可以:
* 查看[插件通用 API](/zh/plugin/dev/apis/common)