> ## Documentation Index
> Fetch the complete documentation index at: https://docs.langbot.app/llms.txt
> Use this file to discover all available pages before exploring further.
# 调试插件运行时、CLI、SDK
插件运行时、CLI、SDK 开源在: [https://github.com/langbot-app/langbot-plugin-sdk](https://github.com/langbot-app/langbot-plugin-sdk)
由于 LangBot 需要依赖 langbot-plugin-sdk 中定义的实体,我们推荐您在一个新建目录下打开 VS Code,将 LangBot 和 langbot-plugin-sdk(git clone [https://github.com/langbot-app/langbot-plugin-sdk)](https://github.com/langbot-app/langbot-plugin-sdk)) 作为子目录放入其中,目录结构如下:
```bash theme={null}
langbot-projects
├── LangBot
├── langbot-plugin-sdk
```
进入 LangBot 目录,安装依赖:
```bash theme={null}
cd LangBot
uv sync --dev
```
此时,uv 将自动为您创建虚拟环境(.venv),若您的编辑器询问您是否使用此虚拟环境,请选择`是`。
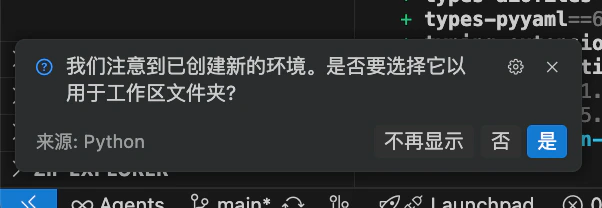 若未弹出,请手动在右下角设置 Python 解释器路径为该 venv 中的解释器。
然后打开 VS Code 底部的终端,这将自动激活 venv。
或者请您手动激活此虚拟环境:
```bash theme={null}
# 请自行根据.venv路径来修改命令
source .venv/bin/activate
```
## 启动插件运行时
```bash theme={null}
uv run --no-sync lbp rt
```
或通过`python -m langbot_plugin.cli.__init__ rt`启动。
Plugin Runtime 接受以下参数:
* `--debug-only`: 不启动`data/plugins`目录下的插件,仅允许通过调试连接加载插件。
* `--ws-debug-port`: 监听的调试端口,默认是`5401`。
* `--ws-control-port`: 监听的控制端口(供 LangBot 主程序连接),默认是`5400`。
* `-s`: 使用`stdio`接受控制连接。**仅在生产环境使用**。
* `--skip-deps-check`: 为了确保插件依赖均已安装,Runtime 会在每次启动时检查并安装所有已安装插件的依赖。携带此参数可禁用此检查。
### 使 LangBot 使用您本地修改过的 langbot-plugin-sdk
若您修改了诸如消息实体、插件数据定义等内容,需要将其更新到 LangBot 环境,以确保运行期间数据格式兼容。
请在**确保已激活 LangBot 目录下的虚拟环境(.venv)的终端**中,切换目录到 langbot-plugin-sdk 目录下,执行:
```bash theme={null}
uv pip install .
```
这将把您修改后的 langbot-plugin-sdk 安装到 LangBot 的环境。
### 使 LangBot 连接到此运行时
在 LangBot 的`data/config.yaml`中配置`plugin.runtime_ws_url`为`ws://localhost:5400/control/ws`。
```yaml theme={null}
plugin:
runtime_ws_url: ws://localhost:5400/control/ws
```
并在启动 LangBot 主程序时携带启动参数`--standalone-runtime`(如:`uv run --no-sync main.py --standalone-runtime`)。此命令行中,请务必携带`--no-sync`参数,这将确保您刚刚同步的本地 langbot-plugin-sdk 不会被远程的覆盖。\
重启 LangBot,将会使用 WebSocket 连接到此运行时。
## langbot-plugin-sdk 架构
本代码库中包含以下内容:
* `langbot_plugin.api`:插件相关实体和 API 定义。
* `langbot_plugin.assets`:插件模板。
* `langbot_plugin.cli`:插件开发 CLI 工具。
* `langbot_plugin.entities`:插件系统中非 API 定义的相关实体。
* `langbot_plugin.runtime`:插件运行时和底层通信(stdio 和 websocket)实现。
## `lbp` CLI 工具
CLI 工具提供 Runtime 启动、插件初始化、插件组件管理、Marketplace 交互等功能。
详细的程序入口请查看[`langbot_plugin.cli.__init__`](https://github.com/langbot-app/langbot-plugin-sdk/blob/main/src/langbot_plugin/cli/__init__.py)。
若未弹出,请手动在右下角设置 Python 解释器路径为该 venv 中的解释器。
然后打开 VS Code 底部的终端,这将自动激活 venv。
或者请您手动激活此虚拟环境:
```bash theme={null}
# 请自行根据.venv路径来修改命令
source .venv/bin/activate
```
## 启动插件运行时
```bash theme={null}
uv run --no-sync lbp rt
```
或通过`python -m langbot_plugin.cli.__init__ rt`启动。
Plugin Runtime 接受以下参数:
* `--debug-only`: 不启动`data/plugins`目录下的插件,仅允许通过调试连接加载插件。
* `--ws-debug-port`: 监听的调试端口,默认是`5401`。
* `--ws-control-port`: 监听的控制端口(供 LangBot 主程序连接),默认是`5400`。
* `-s`: 使用`stdio`接受控制连接。**仅在生产环境使用**。
* `--skip-deps-check`: 为了确保插件依赖均已安装,Runtime 会在每次启动时检查并安装所有已安装插件的依赖。携带此参数可禁用此检查。
### 使 LangBot 使用您本地修改过的 langbot-plugin-sdk
若您修改了诸如消息实体、插件数据定义等内容,需要将其更新到 LangBot 环境,以确保运行期间数据格式兼容。
请在**确保已激活 LangBot 目录下的虚拟环境(.venv)的终端**中,切换目录到 langbot-plugin-sdk 目录下,执行:
```bash theme={null}
uv pip install .
```
这将把您修改后的 langbot-plugin-sdk 安装到 LangBot 的环境。
### 使 LangBot 连接到此运行时
在 LangBot 的`data/config.yaml`中配置`plugin.runtime_ws_url`为`ws://localhost:5400/control/ws`。
```yaml theme={null}
plugin:
runtime_ws_url: ws://localhost:5400/control/ws
```
并在启动 LangBot 主程序时携带启动参数`--standalone-runtime`(如:`uv run --no-sync main.py --standalone-runtime`)。此命令行中,请务必携带`--no-sync`参数,这将确保您刚刚同步的本地 langbot-plugin-sdk 不会被远程的覆盖。\
重启 LangBot,将会使用 WebSocket 连接到此运行时。
## langbot-plugin-sdk 架构
本代码库中包含以下内容:
* `langbot_plugin.api`:插件相关实体和 API 定义。
* `langbot_plugin.assets`:插件模板。
* `langbot_plugin.cli`:插件开发 CLI 工具。
* `langbot_plugin.entities`:插件系统中非 API 定义的相关实体。
* `langbot_plugin.runtime`:插件运行时和底层通信(stdio 和 websocket)实现。
## `lbp` CLI 工具
CLI 工具提供 Runtime 启动、插件初始化、插件组件管理、Marketplace 交互等功能。
详细的程序入口请查看[`langbot_plugin.cli.__init__`](https://github.com/langbot-app/langbot-plugin-sdk/blob/main/src/langbot_plugin/cli/__init__.py)。