> ## Documentation Index
> Fetch the complete documentation index at: https://docs.langbot.app/llms.txt
> Use this file to discover all available pages before exploring further.
# 深入 LangBot 插件系统:进程隔离、事件驱动与组件化架构
> 从源码层面深入剖析 LangBot 4.0 插件系统的架构设计——进程隔离通信、事件驱动钩子、组件化扩展模型,以及与 Dify/MCP 等系统的对比思考。
本文同步自 LangBot Blog。 [阅读 Blog 原文](https://langbot.app/zh/blog/langbot-plugin-system-deep-dive).
发布于 2026-02-23 · 作者:LangBot Team
 大多数聊天机器人框架的"插件系统"不过是一个 Python 模块的动态导入。LangBot 4.0 选择了一条更难但更正确的路——**每个插件运行在独立进程中**,通过结构化的 JSON-RPC 风格协议与宿主通信。
这篇文章将从源码出发,完整拆解这套系统的设计。
## 整体架构:三层进程模型
LangBot 的插件系统由三层进程协作:
大多数聊天机器人框架的"插件系统"不过是一个 Python 模块的动态导入。LangBot 4.0 选择了一条更难但更正确的路——**每个插件运行在独立进程中**,通过结构化的 JSON-RPC 风格协议与宿主通信。
这篇文章将从源码出发,完整拆解这套系统的设计。
## 整体架构:三层进程模型
LangBot 的插件系统由三层进程协作:
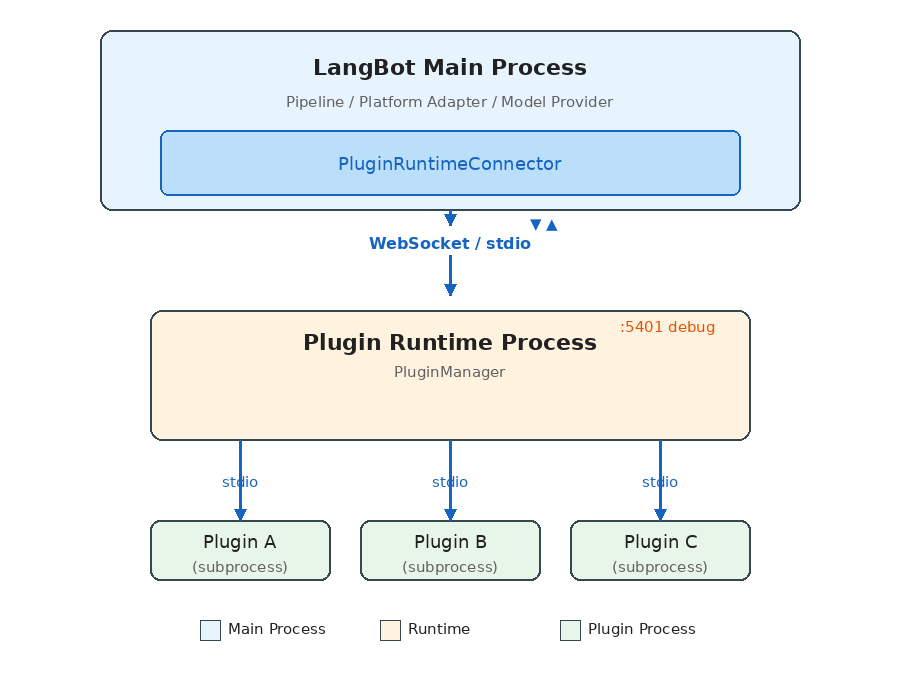 **三个层次各司其职:**
1. **LangBot 主进程**:运行业务逻辑(消息处理流水线、平台适配、模型调用),通过 `PluginRuntimeConnector` 连接 Runtime。
2. **Plugin Runtime**:插件的"编排层",负责发现、启动、管理所有插件子进程,接收主进程的指令并分发到对应插件。
3. **插件子进程**:每个插件独立运行在自己的 Python 进程中,通过 stdio 管道与 Runtime 通信。
### 为什么要三层而不是两层?
直觉的设计是主进程直接管理插件进程。LangBot 选择中间加一层 Runtime 的原因是**部署灵活性**:
* **本地开发**:主进程通过 stdio 直接启动 Runtime 子进程(零配置)
* **Docker 生产环境**:Runtime 作为独立容器运行,主进程通过 WebSocket 连接
* **Windows 兼容**:由于 Windows 的 asyncio 不完整支持 stdio 子进程,Windows 上自动降级为 WebSocket 通信
这意味着同一套代码,不改配置,就能适配从开发到生产的全部场景。
## 通信协议:JSON-RPC 风格的请求/响应
所有跨进程通信基于一个统一的协议层。核心数据结构非常简洁:
```python theme={null}
# 请求
class ActionRequest(pydantic.BaseModel):
seq_id: int # 序列号,用于匹配请求和响应
action: str # 动作名称
data: dict # 载荷
# 响应
class ActionResponse(pydantic.BaseModel):
seq_id: int
code: int # 0 = 成功
message: str
data: dict
chunk_status: str # "continue" | "end"(支持流式响应)
```
通信层 `Handler` 是整个系统的核心抽象。它同时扮演 RPC 客户端和服务端:
```python theme={null}
class Handler:
async def call_action(self, action, data, timeout=15.0) -> dict:
"""主动调用对端提供的 action,等待响应"""
self.seq_id_index += 1
request = ActionRequest.make_request(self.seq_id_index, action.value, data)
future = asyncio.Future()
self.resp_waiters[self.seq_id_index] = future
await self.conn.send(json.dumps(request.model_dump()))
response = await asyncio.wait_for(future, timeout)
return response.data
@action(SomeAction.DO_SOMETHING)
async def handle_something(data: dict) -> ActionResponse:
"""注册一个 action 供对端调用"""
return ActionResponse.success({"result": "ok"})
```
**关键设计点:**
* 基于 `seq_id` 的请求/响应匹配,支持全双工并发调用
* 支持流式响应(`chunk_status`),用于命令执行等长时间操作
* 大消息自动分块传输(stdio 16KB / WebSocket 64KB 分块)
* 文件传输通过 base64 分块机制实现,不走消息通道
### Action 枚举:清晰的 API 契约
系统通过四组枚举严格定义了所有跨进程调用:
```python theme={null}
# 插件 → Runtime(插件进程主动请求)
class PluginToRuntimeAction:
REGISTER_PLUGIN = "register_plugin"
SEND_MESSAGE = "send_message" # 发送消息到平台
INVOKE_LLM = "invoke_llm" # 调用大模型
SET_PLUGIN_STORAGE = "set_plugin_storage" # 持久化存储
# ...
# Runtime → 插件(Runtime 下发指令)
class RuntimeToPluginAction:
INITIALIZE_PLUGIN = "initialize_plugin"
EMIT_EVENT = "emit_event" # 触发事件
CALL_TOOL = "call_tool" # 调用工具
EXECUTE_COMMAND = "execute_command" # 执行命令
SHUTDOWN = "shutdown"
# ...
# LangBot 主进程 → Runtime
class LangBotToRuntimeAction:
INSTALL_PLUGIN = "install_plugin"
EMIT_EVENT = "emit_event"
LIST_TOOLS = "list_tools"
# ...
# Runtime → LangBot 主进程
class RuntimeToLangBotAction:
GET_PLUGIN_SETTINGS = "get_plugin_settings"
SET_BINARY_STORAGE = "set_binary_storage"
# ...
```
这种设计让 API 边界一目了然:插件能做什么、不能做什么,全部由枚举定义。
## 插件生命周期
一个插件从安装到运行,经历以下阶段:
### 1. 发现(Discovery)
Runtime 启动时扫描 `data/plugins/` 目录:
```python theme={null}
async def launch_all_plugins(self):
for plugin_path in glob.glob("data/plugins/*"):
if not os.path.isdir(plugin_path):
continue
task = self.launch_plugin(plugin_path)
self.plugin_run_tasks.append(task)
```
目录名约定为 `{author}__{name}`,每个目录包含 `manifest.yaml` 和插件代码。
### 2. 启动(Launch)
Runtime 为每个插件启动独立子进程:
```python theme={null}
async def launch_plugin(self, plugin_path: str):
python_path = sys.executable
args = ["-m", "langbot_plugin.cli.__init__", "run", "-s", "--prod"]
ctrl = StdioClientController(
command=python_path,
args=args,
working_dir=plugin_path, # 每个插件在自己的目录下运行
)
await ctrl.run(new_plugin_connection_callback)
```
**关键细节**:插件进程的工作目录设置为插件自身目录,这实现了天然的文件系统隔离。
### 3. 注册(Register)
插件进程启动后,主动向 Runtime 注册自己:
```python theme={null}
# 插件侧
action = PluginToRuntimeAction.REGISTER_PLUGIN
# 携带:manifest、组件列表、配置 schema 等
# Runtime 侧处理注册
async def register_plugin(self, handler, container_data, debug_plugin=False):
plugin_container = PluginContainer.from_dict(container_data)
# 从主进程获取插件配置
plugin_settings = await self.context.control_handler.call_action(
RuntimeToLangBotAction.GET_PLUGIN_SETTINGS, {...}
)
# 初始化插件(下发配置)
await handler.initialize_plugin(plugin_settings)
# 存储插件容器
self.plugins.append(plugin_container)
```
### 4. 运行(Running)
插件进入 `INITIALIZED` 状态后,即可接收事件、工具调用、命令执行等请求。
### 5. 卸载(Shutdown)
```python theme={null}
async def shutdown_plugin(self, plugin_container):
# 1. 通知插件进程关闭
await plugin_container._runtime_plugin_handler.shutdown_plugin()
# 2. 关闭通信连接
await plugin_container._runtime_plugin_handler.conn.close()
# 3. 终止子进程
if handler.stdio_process is not None:
handler.stdio_process.kill()
await asyncio.wait_for(handler.stdio_process.wait(), timeout=2)
```
## 组件系统:四种扩展类型
LangBot 的插件不是一个单一的 hook 函数,而是一个**组件容器**。一个插件可以同时提供多种类型的组件:
### EventListener(事件监听器)
最基础的扩展方式——监听流水线中的事件:
```python theme={null}
from langbot_plugin.api.definition.components.common.event_listener import EventListener
from langbot_plugin.api.entities.events import PersonNormalMessageReceived
from langbot_plugin.api.entities.context import EventContext
class MyListener(EventListener):
@EventListener.handler(PersonNormalMessageReceived)
async def on_person_message(self, ctx: EventContext):
event = ctx.event
# 修改用户消息(在发送给 LLM 之前)
event.user_message_alter = "请用诗歌形式回答:" + event.text_message
# 或者阻止后续处理
# ctx.prevent_default()
# ctx.prevent_postorder()
```
支持的事件类型覆盖消息处理的完整生命周期:
| 事件 | 触发时机 |
| ----------------------------- | ------------ |
| `PersonMessageReceived` | 收到私聊消息 |
| `GroupMessageReceived` | 收到群聊消息 |
| `PersonNormalMessageReceived` | 判定为需处理的私聊消息 |
| `GroupNormalMessageReceived` | 判定为需处理的群聊消息 |
| `NormalMessageResponded` | LLM 回复完成 |
| `PromptPreProcessing` | Prompt 预处理阶段 |
事件传播支持两种中断:
* `prevent_default()`:阻止默认行为(如跳过 LLM 调用)
* `prevent_postorder()`:阻止后续插件执行
### Tool(工具)
供 LLM 的 Function Calling 调用的工具:
```python theme={null}
from langbot_plugin.api.definition.components.tool.tool import Tool
class WeatherTool(Tool):
async def call(self, params: dict, session, query_id: int) -> str:
city = params.get("city", "Beijing")
# 调用天气 API ...
return f"{city} 今天晴,25°C"
```
工具的元数据(名称、描述、参数 schema)定义在配套的 YAML manifest 文件中,LangBot 会自动将其转换为 LLM 能理解的 Function 定义。
### Command(命令)
用户通过 `!command` 触发的命令,支持子命令注册:
```python theme={null}
from langbot_plugin.api.definition.components.command.command import Command
class MyCommand(Command):
def __init__(self):
super().__init__()
@self.subcommand("hello", help="Say hello")
async def hello(self, ctx):
yield CommandReturn(text="Hello from plugin!")
@self.subcommand("status", help="Show status")
async def status(self, ctx):
yield CommandReturn(text="All systems operational.")
```
命令的执行结果通过 `AsyncGenerator` 返回,天然支持流式输出。
### KnowledgeRetriever(知识检索器)
多实例组件,用于接入外部知识库:
```python theme={null}
from langbot_plugin.api.definition.components.knowledge_retriever.retriever import KnowledgeRetriever
class MyRetriever(KnowledgeRetriever):
async def retrieve(self, context) -> list:
# 从外部向量数据库检索
results = await self.search_external_db(context.query)
return [RetrievalResultEntry(content=r) for r in results]
```
KnowledgeRetriever 是**多态组件(PolymorphicComponent)**——同一个检索器类可以创建多个实例,每个实例有独立的配置。这允许用户连接多个不同的外部知识库。
## SDK API:插件能做什么
插件通过 `BasePlugin` 基类继承的 `LangBotAPIProxy` 获得丰富的能力:
```python theme={null}
class LangBotAPIProxy:
# 消息操作
async def send_message(self, bot_uuid, target_type, target_id, message_chain)
# 模型调用
async def get_llm_models(self) -> list[str]
async def invoke_llm(self, model_uuid, messages, funcs=[], extra_args={})
# 持久化存储(插件级别隔离)
async def set_plugin_storage(self, key, value: bytes)
async def get_plugin_storage(self, key) -> bytes
# 工作区存储(跨插件共享)
async def set_workspace_storage(self, key, value: bytes)
async def get_workspace_storage(self, key) -> bytes
# 系统信息
async def get_langbot_version(self) -> str
async def get_bots(self) -> list[str]
async def list_plugins_manifest(self) -> list
```
**存储 API 的设计值得注意**:提供了两个级别的 KV 存储——`plugin_storage`(插件私有)和 `workspace_storage`(全局共享),数据以 bytes 形式存储(base64 序列化传输),简单但足够灵活。
## 事件分发机制
事件从主进程到插件的完整路径:
**三个层次各司其职:**
1. **LangBot 主进程**:运行业务逻辑(消息处理流水线、平台适配、模型调用),通过 `PluginRuntimeConnector` 连接 Runtime。
2. **Plugin Runtime**:插件的"编排层",负责发现、启动、管理所有插件子进程,接收主进程的指令并分发到对应插件。
3. **插件子进程**:每个插件独立运行在自己的 Python 进程中,通过 stdio 管道与 Runtime 通信。
### 为什么要三层而不是两层?
直觉的设计是主进程直接管理插件进程。LangBot 选择中间加一层 Runtime 的原因是**部署灵活性**:
* **本地开发**:主进程通过 stdio 直接启动 Runtime 子进程(零配置)
* **Docker 生产环境**:Runtime 作为独立容器运行,主进程通过 WebSocket 连接
* **Windows 兼容**:由于 Windows 的 asyncio 不完整支持 stdio 子进程,Windows 上自动降级为 WebSocket 通信
这意味着同一套代码,不改配置,就能适配从开发到生产的全部场景。
## 通信协议:JSON-RPC 风格的请求/响应
所有跨进程通信基于一个统一的协议层。核心数据结构非常简洁:
```python theme={null}
# 请求
class ActionRequest(pydantic.BaseModel):
seq_id: int # 序列号,用于匹配请求和响应
action: str # 动作名称
data: dict # 载荷
# 响应
class ActionResponse(pydantic.BaseModel):
seq_id: int
code: int # 0 = 成功
message: str
data: dict
chunk_status: str # "continue" | "end"(支持流式响应)
```
通信层 `Handler` 是整个系统的核心抽象。它同时扮演 RPC 客户端和服务端:
```python theme={null}
class Handler:
async def call_action(self, action, data, timeout=15.0) -> dict:
"""主动调用对端提供的 action,等待响应"""
self.seq_id_index += 1
request = ActionRequest.make_request(self.seq_id_index, action.value, data)
future = asyncio.Future()
self.resp_waiters[self.seq_id_index] = future
await self.conn.send(json.dumps(request.model_dump()))
response = await asyncio.wait_for(future, timeout)
return response.data
@action(SomeAction.DO_SOMETHING)
async def handle_something(data: dict) -> ActionResponse:
"""注册一个 action 供对端调用"""
return ActionResponse.success({"result": "ok"})
```
**关键设计点:**
* 基于 `seq_id` 的请求/响应匹配,支持全双工并发调用
* 支持流式响应(`chunk_status`),用于命令执行等长时间操作
* 大消息自动分块传输(stdio 16KB / WebSocket 64KB 分块)
* 文件传输通过 base64 分块机制实现,不走消息通道
### Action 枚举:清晰的 API 契约
系统通过四组枚举严格定义了所有跨进程调用:
```python theme={null}
# 插件 → Runtime(插件进程主动请求)
class PluginToRuntimeAction:
REGISTER_PLUGIN = "register_plugin"
SEND_MESSAGE = "send_message" # 发送消息到平台
INVOKE_LLM = "invoke_llm" # 调用大模型
SET_PLUGIN_STORAGE = "set_plugin_storage" # 持久化存储
# ...
# Runtime → 插件(Runtime 下发指令)
class RuntimeToPluginAction:
INITIALIZE_PLUGIN = "initialize_plugin"
EMIT_EVENT = "emit_event" # 触发事件
CALL_TOOL = "call_tool" # 调用工具
EXECUTE_COMMAND = "execute_command" # 执行命令
SHUTDOWN = "shutdown"
# ...
# LangBot 主进程 → Runtime
class LangBotToRuntimeAction:
INSTALL_PLUGIN = "install_plugin"
EMIT_EVENT = "emit_event"
LIST_TOOLS = "list_tools"
# ...
# Runtime → LangBot 主进程
class RuntimeToLangBotAction:
GET_PLUGIN_SETTINGS = "get_plugin_settings"
SET_BINARY_STORAGE = "set_binary_storage"
# ...
```
这种设计让 API 边界一目了然:插件能做什么、不能做什么,全部由枚举定义。
## 插件生命周期
一个插件从安装到运行,经历以下阶段:
### 1. 发现(Discovery)
Runtime 启动时扫描 `data/plugins/` 目录:
```python theme={null}
async def launch_all_plugins(self):
for plugin_path in glob.glob("data/plugins/*"):
if not os.path.isdir(plugin_path):
continue
task = self.launch_plugin(plugin_path)
self.plugin_run_tasks.append(task)
```
目录名约定为 `{author}__{name}`,每个目录包含 `manifest.yaml` 和插件代码。
### 2. 启动(Launch)
Runtime 为每个插件启动独立子进程:
```python theme={null}
async def launch_plugin(self, plugin_path: str):
python_path = sys.executable
args = ["-m", "langbot_plugin.cli.__init__", "run", "-s", "--prod"]
ctrl = StdioClientController(
command=python_path,
args=args,
working_dir=plugin_path, # 每个插件在自己的目录下运行
)
await ctrl.run(new_plugin_connection_callback)
```
**关键细节**:插件进程的工作目录设置为插件自身目录,这实现了天然的文件系统隔离。
### 3. 注册(Register)
插件进程启动后,主动向 Runtime 注册自己:
```python theme={null}
# 插件侧
action = PluginToRuntimeAction.REGISTER_PLUGIN
# 携带:manifest、组件列表、配置 schema 等
# Runtime 侧处理注册
async def register_plugin(self, handler, container_data, debug_plugin=False):
plugin_container = PluginContainer.from_dict(container_data)
# 从主进程获取插件配置
plugin_settings = await self.context.control_handler.call_action(
RuntimeToLangBotAction.GET_PLUGIN_SETTINGS, {...}
)
# 初始化插件(下发配置)
await handler.initialize_plugin(plugin_settings)
# 存储插件容器
self.plugins.append(plugin_container)
```
### 4. 运行(Running)
插件进入 `INITIALIZED` 状态后,即可接收事件、工具调用、命令执行等请求。
### 5. 卸载(Shutdown)
```python theme={null}
async def shutdown_plugin(self, plugin_container):
# 1. 通知插件进程关闭
await plugin_container._runtime_plugin_handler.shutdown_plugin()
# 2. 关闭通信连接
await plugin_container._runtime_plugin_handler.conn.close()
# 3. 终止子进程
if handler.stdio_process is not None:
handler.stdio_process.kill()
await asyncio.wait_for(handler.stdio_process.wait(), timeout=2)
```
## 组件系统:四种扩展类型
LangBot 的插件不是一个单一的 hook 函数,而是一个**组件容器**。一个插件可以同时提供多种类型的组件:
### EventListener(事件监听器)
最基础的扩展方式——监听流水线中的事件:
```python theme={null}
from langbot_plugin.api.definition.components.common.event_listener import EventListener
from langbot_plugin.api.entities.events import PersonNormalMessageReceived
from langbot_plugin.api.entities.context import EventContext
class MyListener(EventListener):
@EventListener.handler(PersonNormalMessageReceived)
async def on_person_message(self, ctx: EventContext):
event = ctx.event
# 修改用户消息(在发送给 LLM 之前)
event.user_message_alter = "请用诗歌形式回答:" + event.text_message
# 或者阻止后续处理
# ctx.prevent_default()
# ctx.prevent_postorder()
```
支持的事件类型覆盖消息处理的完整生命周期:
| 事件 | 触发时机 |
| ----------------------------- | ------------ |
| `PersonMessageReceived` | 收到私聊消息 |
| `GroupMessageReceived` | 收到群聊消息 |
| `PersonNormalMessageReceived` | 判定为需处理的私聊消息 |
| `GroupNormalMessageReceived` | 判定为需处理的群聊消息 |
| `NormalMessageResponded` | LLM 回复完成 |
| `PromptPreProcessing` | Prompt 预处理阶段 |
事件传播支持两种中断:
* `prevent_default()`:阻止默认行为(如跳过 LLM 调用)
* `prevent_postorder()`:阻止后续插件执行
### Tool(工具)
供 LLM 的 Function Calling 调用的工具:
```python theme={null}
from langbot_plugin.api.definition.components.tool.tool import Tool
class WeatherTool(Tool):
async def call(self, params: dict, session, query_id: int) -> str:
city = params.get("city", "Beijing")
# 调用天气 API ...
return f"{city} 今天晴,25°C"
```
工具的元数据(名称、描述、参数 schema)定义在配套的 YAML manifest 文件中,LangBot 会自动将其转换为 LLM 能理解的 Function 定义。
### Command(命令)
用户通过 `!command` 触发的命令,支持子命令注册:
```python theme={null}
from langbot_plugin.api.definition.components.command.command import Command
class MyCommand(Command):
def __init__(self):
super().__init__()
@self.subcommand("hello", help="Say hello")
async def hello(self, ctx):
yield CommandReturn(text="Hello from plugin!")
@self.subcommand("status", help="Show status")
async def status(self, ctx):
yield CommandReturn(text="All systems operational.")
```
命令的执行结果通过 `AsyncGenerator` 返回,天然支持流式输出。
### KnowledgeRetriever(知识检索器)
多实例组件,用于接入外部知识库:
```python theme={null}
from langbot_plugin.api.definition.components.knowledge_retriever.retriever import KnowledgeRetriever
class MyRetriever(KnowledgeRetriever):
async def retrieve(self, context) -> list:
# 从外部向量数据库检索
results = await self.search_external_db(context.query)
return [RetrievalResultEntry(content=r) for r in results]
```
KnowledgeRetriever 是**多态组件(PolymorphicComponent)**——同一个检索器类可以创建多个实例,每个实例有独立的配置。这允许用户连接多个不同的外部知识库。
## SDK API:插件能做什么
插件通过 `BasePlugin` 基类继承的 `LangBotAPIProxy` 获得丰富的能力:
```python theme={null}
class LangBotAPIProxy:
# 消息操作
async def send_message(self, bot_uuid, target_type, target_id, message_chain)
# 模型调用
async def get_llm_models(self) -> list[str]
async def invoke_llm(self, model_uuid, messages, funcs=[], extra_args={})
# 持久化存储(插件级别隔离)
async def set_plugin_storage(self, key, value: bytes)
async def get_plugin_storage(self, key) -> bytes
# 工作区存储(跨插件共享)
async def set_workspace_storage(self, key, value: bytes)
async def get_workspace_storage(self, key) -> bytes
# 系统信息
async def get_langbot_version(self) -> str
async def get_bots(self) -> list[str]
async def list_plugins_manifest(self) -> list
```
**存储 API 的设计值得注意**:提供了两个级别的 KV 存储——`plugin_storage`(插件私有)和 `workspace_storage`(全局共享),数据以 bytes 形式存储(base64 序列化传输),简单但足够灵活。
## 事件分发机制
事件从主进程到插件的完整路径:
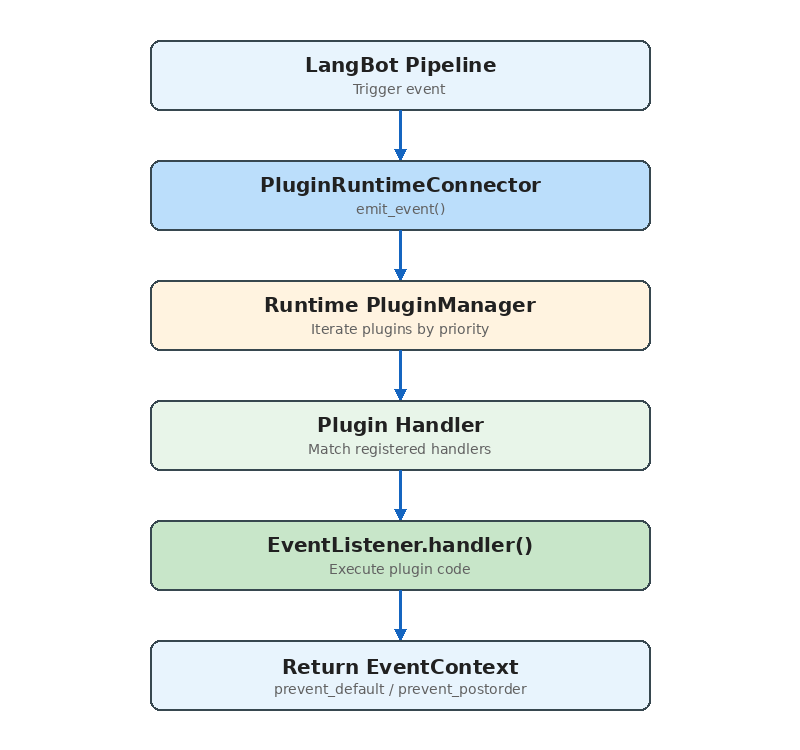 关键源码:
```python theme={null}
async def emit_event(self, event_context, include_plugins=None):
for plugin in self.plugins:
if plugin.status != RuntimeContainerStatus.INITIALIZED:
continue
if not plugin.enabled:
continue
# 流水线级别的插件过滤
if include_plugins is not None:
plugin_id = f"{plugin.manifest.metadata.author}/{plugin.manifest.metadata.name}"
if plugin_id not in include_plugins:
continue
resp = await plugin._runtime_plugin_handler.emit_event(
event_context.model_dump()
)
event_context = EventContext.model_validate(resp["event_context"])
# 插件请求中断后续传播
if event_context.is_prevented_postorder():
break
return emitted_plugins, event_context
```
`include_plugins` 参数实现了**流水线级别的插件绑定**——不同的消息处理流水线可以使用不同的插件子集。
## 安装与分发
插件支持三种安装来源:
1. **本地上传**:`.lbpkg` 文件(实际上是 zip 包,包含 manifest.yaml 和代码)
2. **插件市场**:从 LangBot Space 在线安装
3. **GitHub Release**:从 GitHub 仓库的 Release 资产下载
安装流程:
```python theme={null}
async def install_plugin(self, source, install_info):
yield {"current_action": "downloading plugin package"}
# 1. 获取插件包(解压 zip)
plugin_path, author, name, version = await self.install_plugin_from_file(plugin_file)
yield {"current_action": "installing dependencies"}
# 2. 安装依赖(pip install -r requirements.txt)
pkgmgr_helper.install_requirements(requirements_file)
yield {"current_action": "initializing plugin settings"}
# 3. 初始化配置
await self.context.control_handler.call_action(
RuntimeToLangBotAction.INITIALIZE_PLUGIN_SETTINGS, {...}
)
yield {"current_action": "launching plugin"}
# 4. 启动插件进程
task = self.launch_plugin(plugin_path)
```
整个过程通过 `AsyncGenerator` 流式报告进度,前端可以实时显示安装状态。
## 调试体验
SDK 提供了完善的开发者工具链:
```bash theme={null}
# 初始化新插件
lbp init
# 添加组件
lbp component add
# 本地调试运行
lbp run
# 打包发布
lbp publish
```
**调试模式**的设计特别巧妙:开发者的插件通过 WebSocket 连接到已运行的 Runtime(而非 stdio),这意味着可以在不重启 LangBot 的情况下热重载插件代码。调试插件在 UI 中有特殊标记,不会被误操作删除。
## 与其他系统的对比
### vs Dify 插件
Dify 的插件系统(`dify-plugin-daemon`)与 LangBot 有相似的进程隔离理念,但侧重点不同:
* **Dify**:插件扩展的是工作流节点类型(Tool、Model、Extension),面向 AI 应用编排
* **LangBot**:插件扩展的是消息处理流水线(Event、Tool、Command、KnowledgeRetriever),面向即时通讯场景
LangBot 的 `EventListener` 组件提供了 Dify 没有的能力——在消息处理的任意阶段插入逻辑。
### vs MCP(Model Context Protocol)
MCP 是一个标准化的 AI 工具调用协议。LangBot 的 Tool 组件和 MCP 服务功能上有重叠,但定位不同:
* **MCP**:通用的"AI 调用外部能力"协议,任何 LLM 应用都能用
* **LangBot Tool**:深度集成在消息处理上下文中,能访问会话信息、用户身份等
实际上,LangBot 已经原生支持 MCP——用户可以在 LangBot 中直接配置 MCP 服务器,无需编写插件。而 LangBot 的 Tool 组件适用于需要访问 LangBot 内部上下文的场景。
## 设计决策背后的思考
**为什么选择进程隔离而非线程/协程?**
* 插件代码质量不可控,一个 segfault 不应该崩掉整个服务
* 依赖隔离:不同插件可能依赖同一个库的不同版本
* 资源可控:可以对单个插件进程设置资源限制
**为什么用 JSON 而非 Protobuf/MessagePack?**
* 调试友好:开发者可以直接阅读通信日志
* Python 生态原生支持,无需额外依赖
* 性能瓶颈不在序列化(插件调用频率远低于数据库查询)
**为什么 stdio 优先于 WebSocket?**
* stdio 无需网络栈,延迟更低
* 进程生命周期管理更简单(父进程退出时子进程自动清理)
* WebSocket 只在不支持 stdio 的场景(Docker、Windows)使用
## 总结
LangBot 的插件系统是一个**为生产环境设计的、进程隔离的、事件驱动的组件化扩展框架**。
它的核心设计原则:
1. **安全第一**:进程隔离确保插件不会影响主服务稳定性
2. **部署灵活**:stdio/WebSocket 双模式适配所有环境
3. **开发者友好**:完善的 SDK、CLI 和调试支持
4. **组件化**:四种组件类型覆盖主要扩展需求
如果你有兴趣开发 LangBot 插件,可以从 [插件开发文档](https://docs.langbot.app/zh/plugin/dev/tutor) 开始,或者直接浏览 [插件市场](https://space.langbot.app/market) 中的现有插件获取灵感。
关键源码:
```python theme={null}
async def emit_event(self, event_context, include_plugins=None):
for plugin in self.plugins:
if plugin.status != RuntimeContainerStatus.INITIALIZED:
continue
if not plugin.enabled:
continue
# 流水线级别的插件过滤
if include_plugins is not None:
plugin_id = f"{plugin.manifest.metadata.author}/{plugin.manifest.metadata.name}"
if plugin_id not in include_plugins:
continue
resp = await plugin._runtime_plugin_handler.emit_event(
event_context.model_dump()
)
event_context = EventContext.model_validate(resp["event_context"])
# 插件请求中断后续传播
if event_context.is_prevented_postorder():
break
return emitted_plugins, event_context
```
`include_plugins` 参数实现了**流水线级别的插件绑定**——不同的消息处理流水线可以使用不同的插件子集。
## 安装与分发
插件支持三种安装来源:
1. **本地上传**:`.lbpkg` 文件(实际上是 zip 包,包含 manifest.yaml 和代码)
2. **插件市场**:从 LangBot Space 在线安装
3. **GitHub Release**:从 GitHub 仓库的 Release 资产下载
安装流程:
```python theme={null}
async def install_plugin(self, source, install_info):
yield {"current_action": "downloading plugin package"}
# 1. 获取插件包(解压 zip)
plugin_path, author, name, version = await self.install_plugin_from_file(plugin_file)
yield {"current_action": "installing dependencies"}
# 2. 安装依赖(pip install -r requirements.txt)
pkgmgr_helper.install_requirements(requirements_file)
yield {"current_action": "initializing plugin settings"}
# 3. 初始化配置
await self.context.control_handler.call_action(
RuntimeToLangBotAction.INITIALIZE_PLUGIN_SETTINGS, {...}
)
yield {"current_action": "launching plugin"}
# 4. 启动插件进程
task = self.launch_plugin(plugin_path)
```
整个过程通过 `AsyncGenerator` 流式报告进度,前端可以实时显示安装状态。
## 调试体验
SDK 提供了完善的开发者工具链:
```bash theme={null}
# 初始化新插件
lbp init
# 添加组件
lbp component add
# 本地调试运行
lbp run
# 打包发布
lbp publish
```
**调试模式**的设计特别巧妙:开发者的插件通过 WebSocket 连接到已运行的 Runtime(而非 stdio),这意味着可以在不重启 LangBot 的情况下热重载插件代码。调试插件在 UI 中有特殊标记,不会被误操作删除。
## 与其他系统的对比
### vs Dify 插件
Dify 的插件系统(`dify-plugin-daemon`)与 LangBot 有相似的进程隔离理念,但侧重点不同:
* **Dify**:插件扩展的是工作流节点类型(Tool、Model、Extension),面向 AI 应用编排
* **LangBot**:插件扩展的是消息处理流水线(Event、Tool、Command、KnowledgeRetriever),面向即时通讯场景
LangBot 的 `EventListener` 组件提供了 Dify 没有的能力——在消息处理的任意阶段插入逻辑。
### vs MCP(Model Context Protocol)
MCP 是一个标准化的 AI 工具调用协议。LangBot 的 Tool 组件和 MCP 服务功能上有重叠,但定位不同:
* **MCP**:通用的"AI 调用外部能力"协议,任何 LLM 应用都能用
* **LangBot Tool**:深度集成在消息处理上下文中,能访问会话信息、用户身份等
实际上,LangBot 已经原生支持 MCP——用户可以在 LangBot 中直接配置 MCP 服务器,无需编写插件。而 LangBot 的 Tool 组件适用于需要访问 LangBot 内部上下文的场景。
## 设计决策背后的思考
**为什么选择进程隔离而非线程/协程?**
* 插件代码质量不可控,一个 segfault 不应该崩掉整个服务
* 依赖隔离:不同插件可能依赖同一个库的不同版本
* 资源可控:可以对单个插件进程设置资源限制
**为什么用 JSON 而非 Protobuf/MessagePack?**
* 调试友好:开发者可以直接阅读通信日志
* Python 生态原生支持,无需额外依赖
* 性能瓶颈不在序列化(插件调用频率远低于数据库查询)
**为什么 stdio 优先于 WebSocket?**
* stdio 无需网络栈,延迟更低
* 进程生命周期管理更简单(父进程退出时子进程自动清理)
* WebSocket 只在不支持 stdio 的场景(Docker、Windows)使用
## 总结
LangBot 的插件系统是一个**为生产环境设计的、进程隔离的、事件驱动的组件化扩展框架**。
它的核心设计原则:
1. **安全第一**:进程隔离确保插件不会影响主服务稳定性
2. **部署灵活**:stdio/WebSocket 双模式适配所有环境
3. **开发者友好**:完善的 SDK、CLI 和调试支持
4. **组件化**:四种组件类型覆盖主要扩展需求
如果你有兴趣开发 LangBot 插件,可以从 [插件开发文档](https://docs.langbot.app/zh/plugin/dev/tutor) 开始,或者直接浏览 [插件市场](https://space.langbot.app/market) 中的现有插件获取灵感。