> ## Documentation Index
> Fetch the complete documentation index at: https://docs.langbot.app/llms.txt
> Use this file to discover all available pages before exploring further.
# WeCom Intelligent Bot
## One-Click Setup (Recommended)
LangBot supports one-click WeCom bot creation with automatic BotId and Secret filling — no manual copy-paste needed.
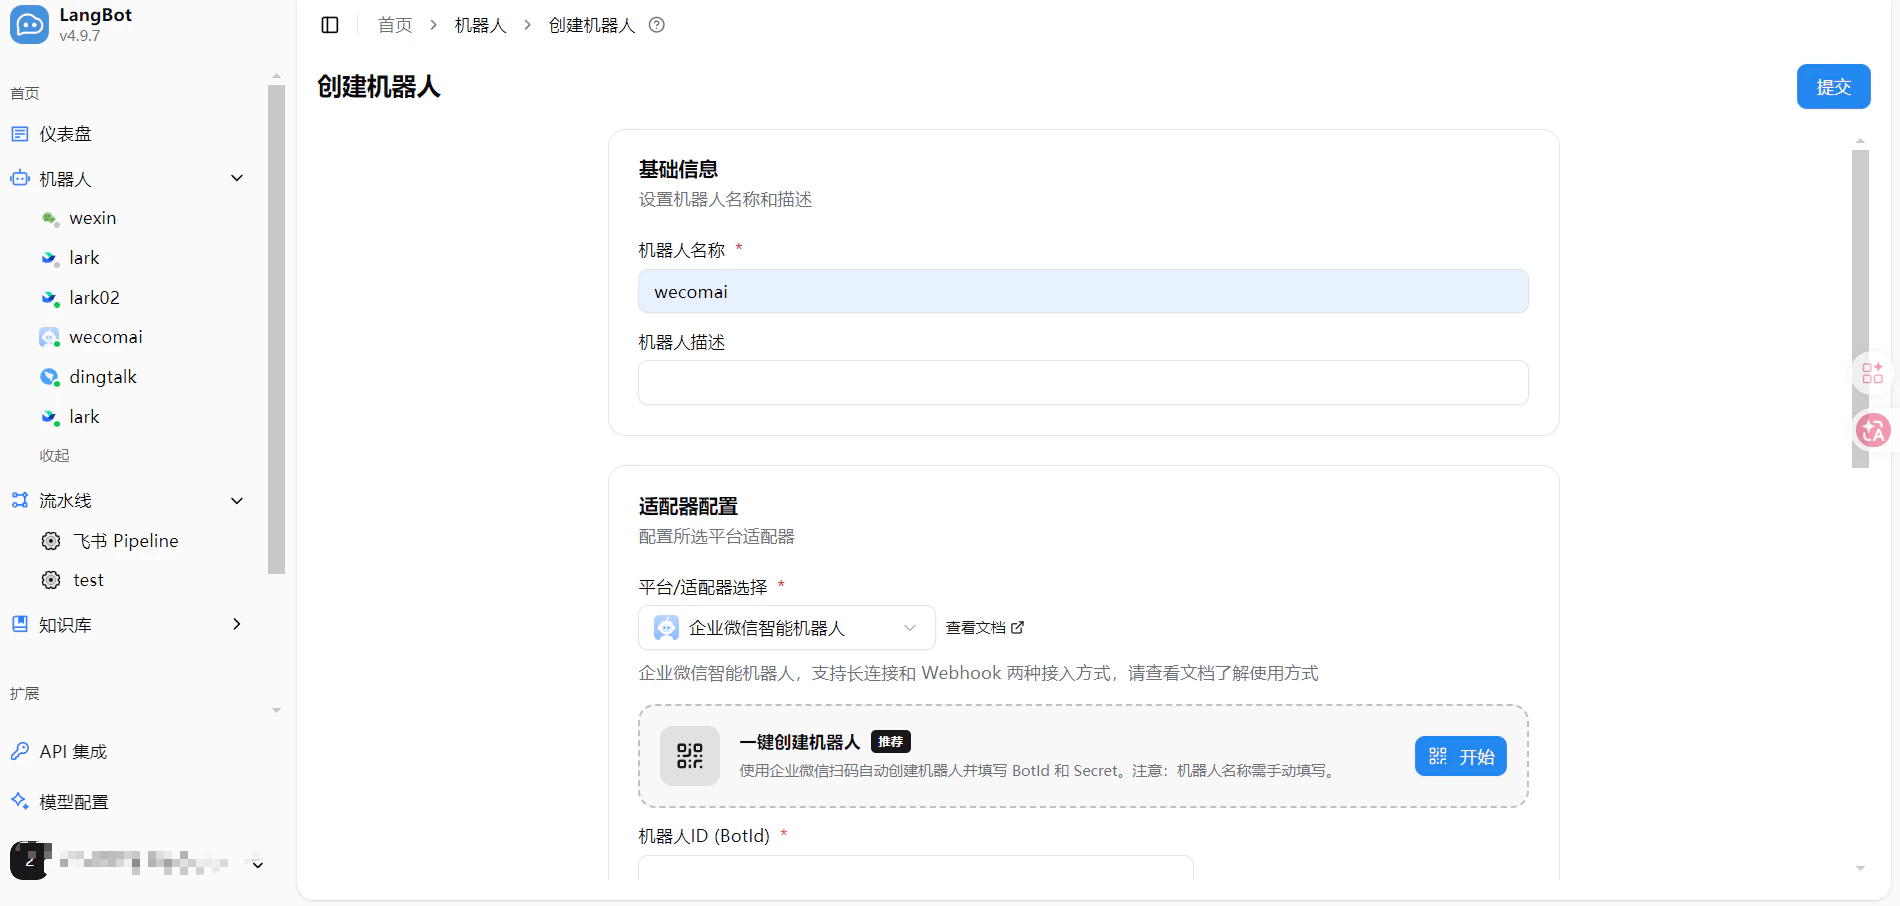
1. Open LangBot WebUI, go to **Bots > Create Bot**
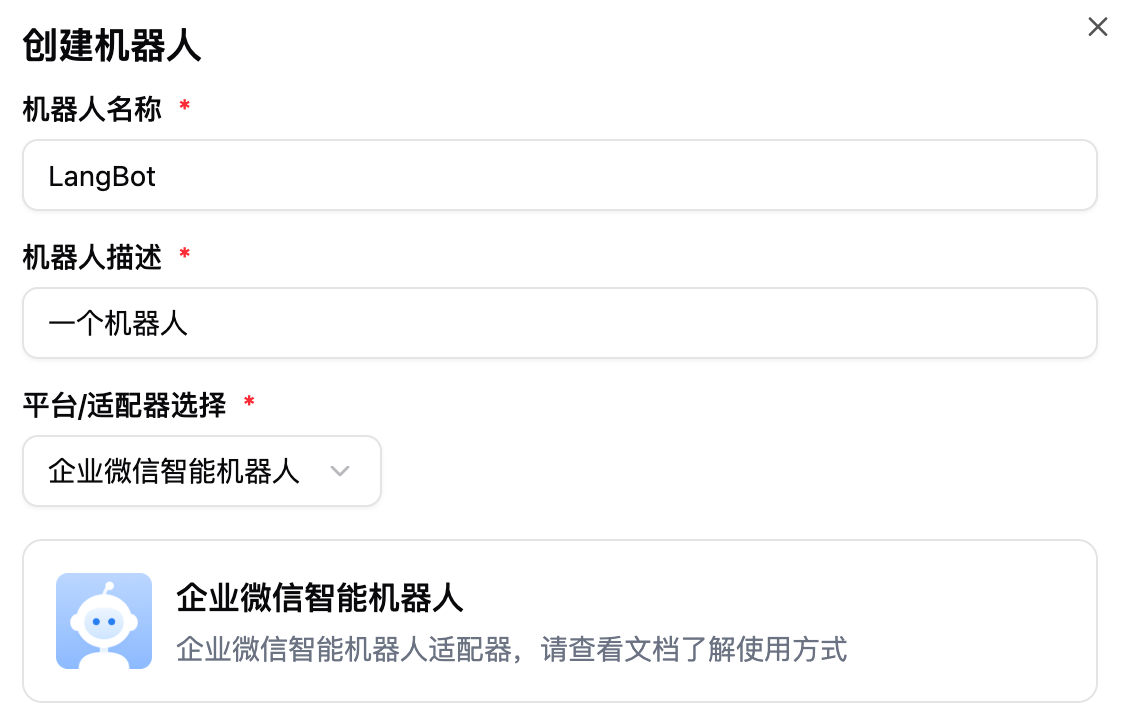
2. Enter a bot name, select `WeCom Intelligent Bot` as the platform/adapter
3. In the **One-Click Create Bot** section that appears, click the **Start** button
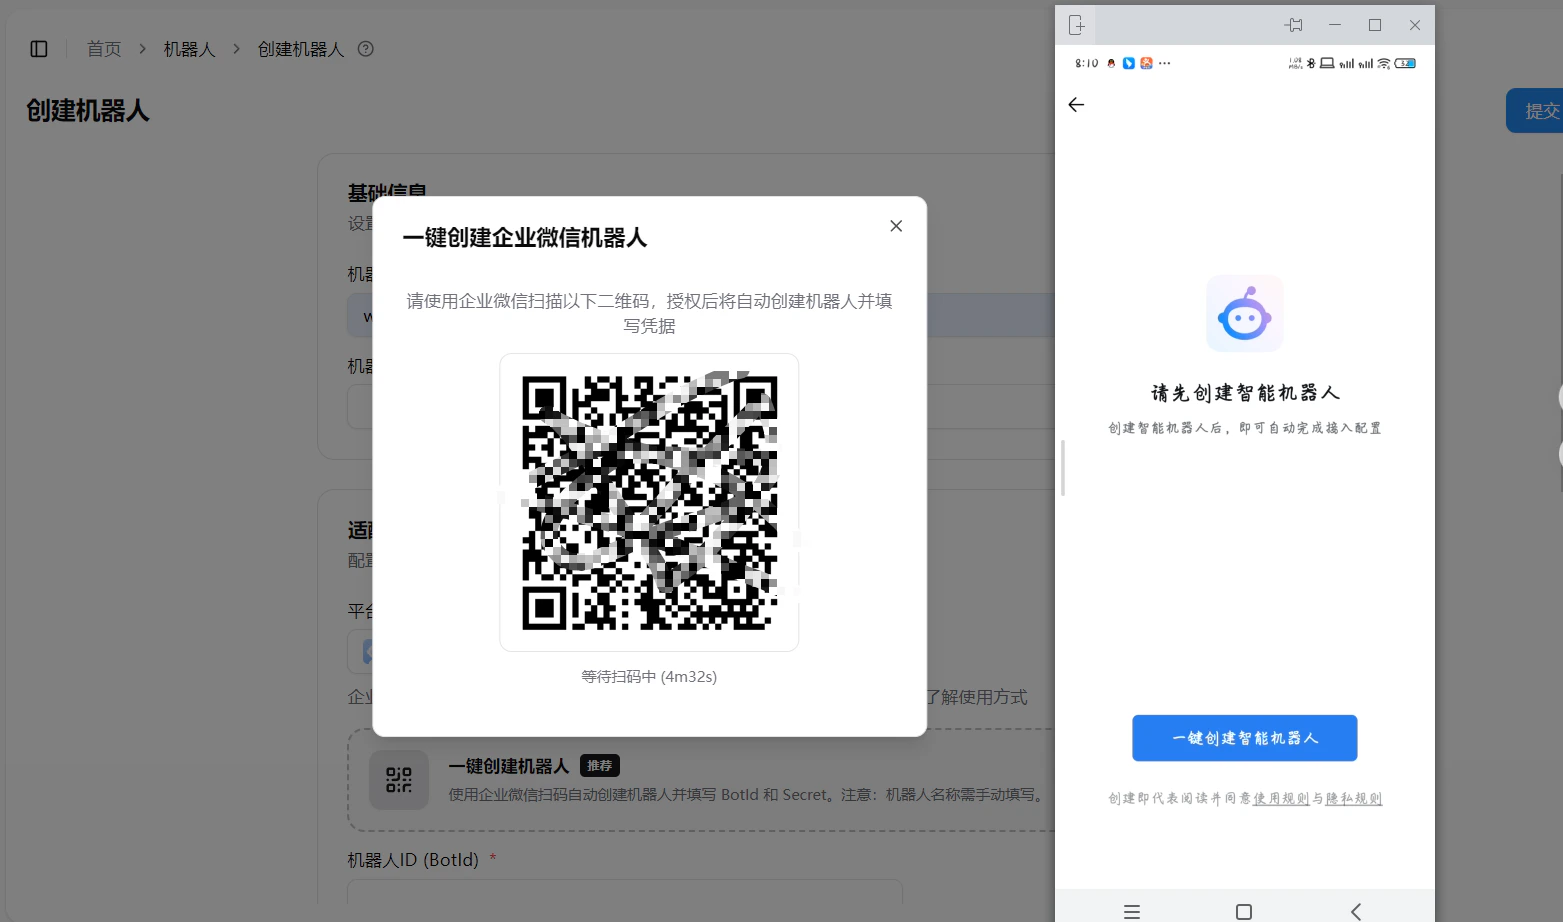
 4. Scan the QR code with WeCom. On your phone, tap **One-Click Create Intelligent Bot**
 5. After authorization, BotId and Secret will be **auto-filled** in the form
6. **Manually fill in the bot name** — it must match the bot name in WeCom
5. After authorization, BotId and Secret will be **auto-filled** in the form
6. **Manually fill in the bot name** — it must match the bot name in WeCom
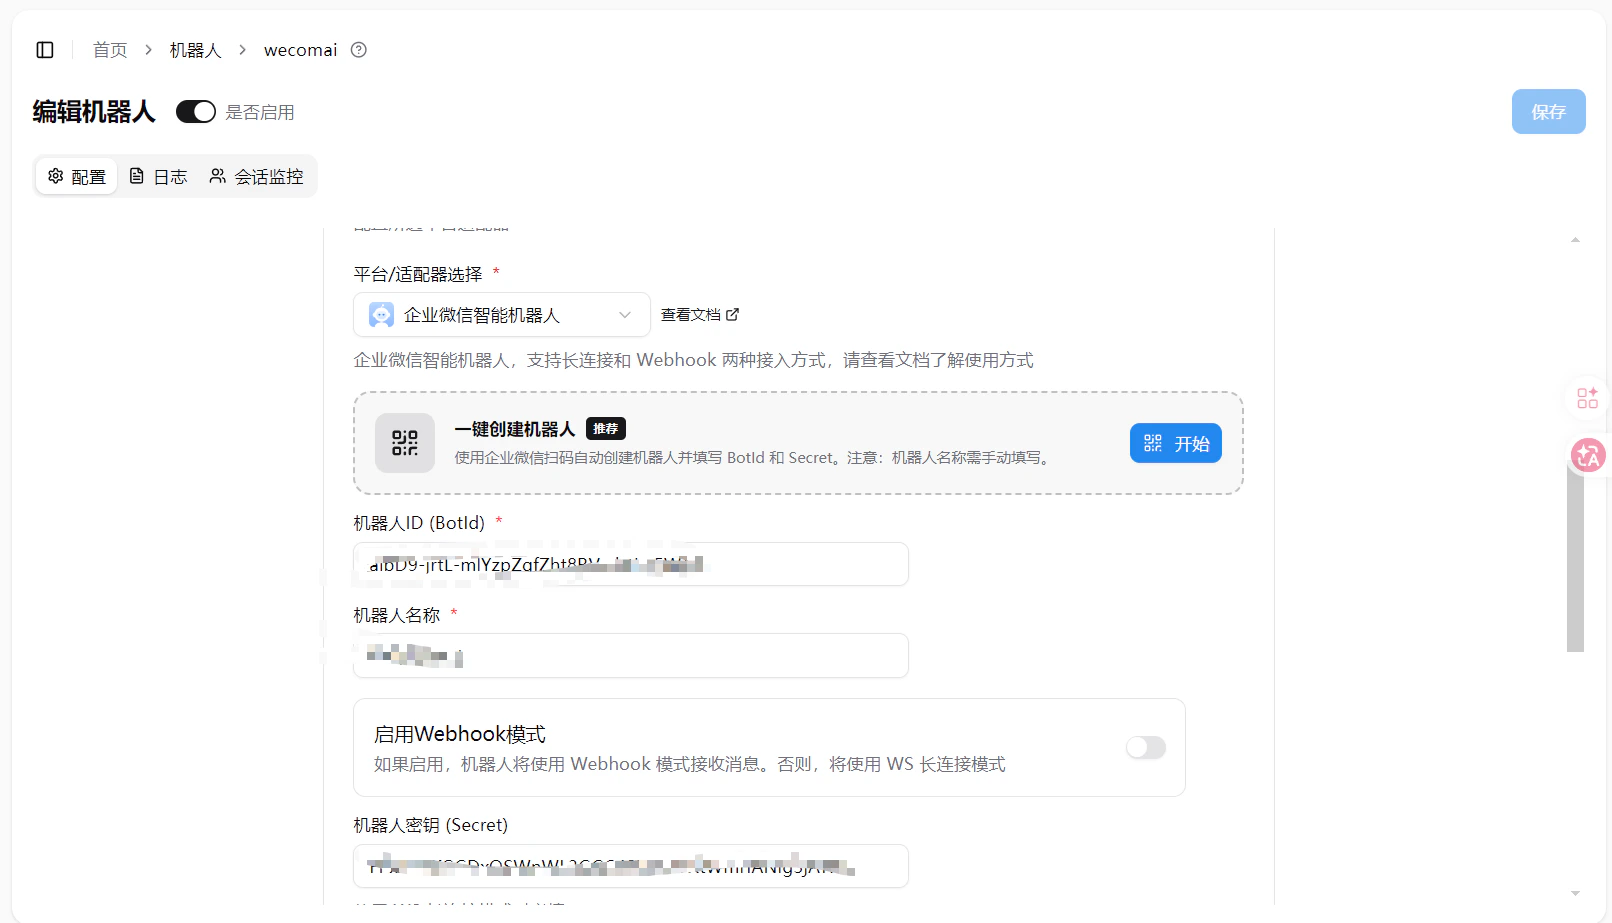 7. Click **Submit** to complete
WeCom Intelligent Bot **cannot use existing bots** for one-click setup — only new bots. To use an existing bot, refer to the manual configuration below.
***
## Manual Configuration
### Creating a Bot
First, log in to the [WeCom Admin Console](https://work.weixin.qq.com/wework_admin/frame#/).
7. Click **Submit** to complete
WeCom Intelligent Bot **cannot use existing bots** for one-click setup — only new bots. To use an existing bot, refer to the manual configuration below.
***
## Manual Configuration
### Creating a Bot
First, log in to the [WeCom Admin Console](https://work.weixin.qq.com/wework_admin/frame#/).
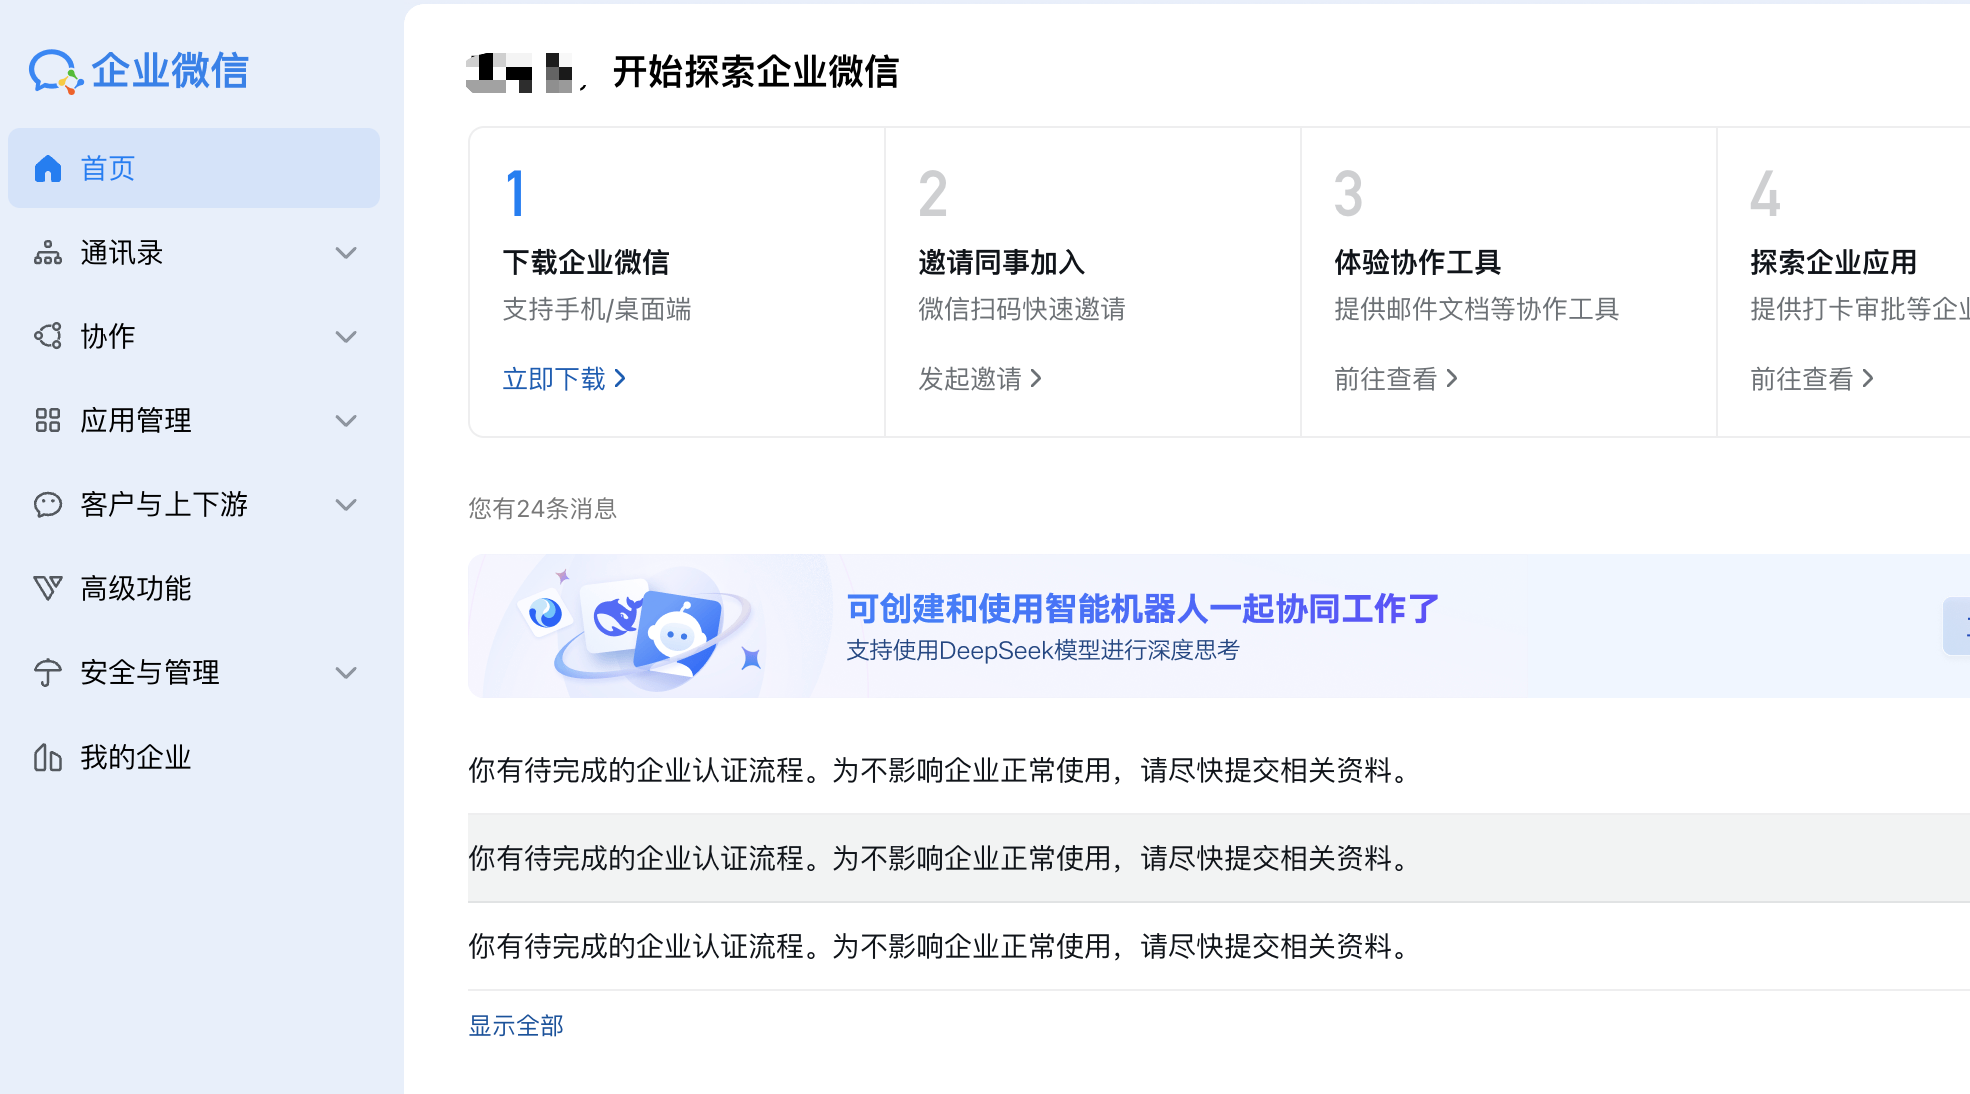 Click `Security And Management` in the left sidebar, then click `Intelligent Bot` under `Management Tool`.
As shown:
Click `Security And Management` in the left sidebar, then click `Intelligent Bot` under `Management Tool`.
As shown:
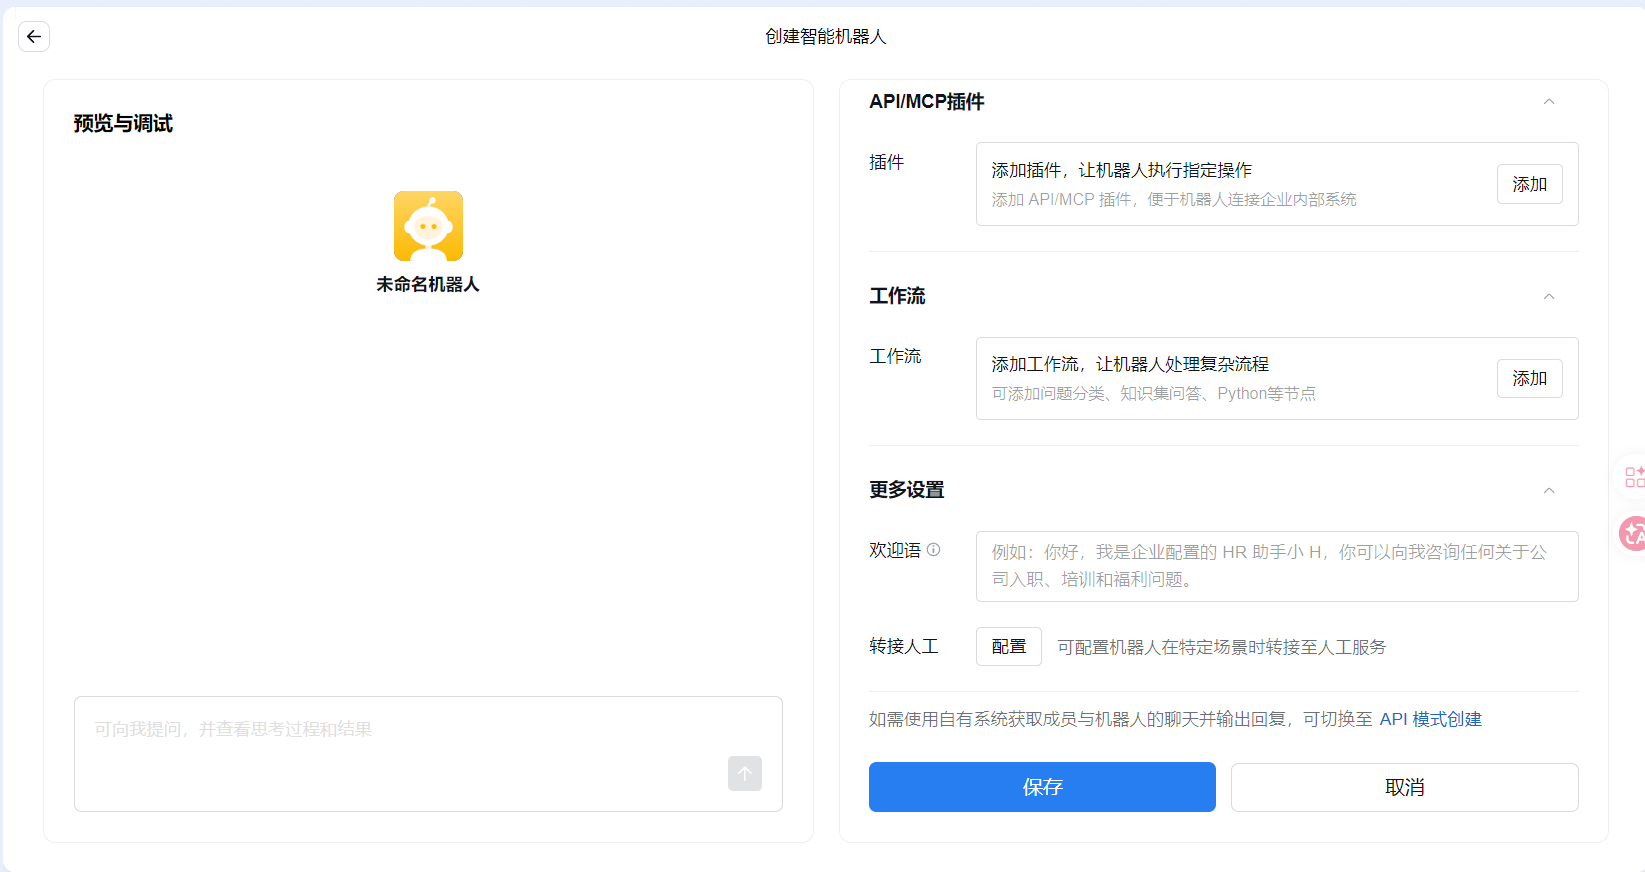
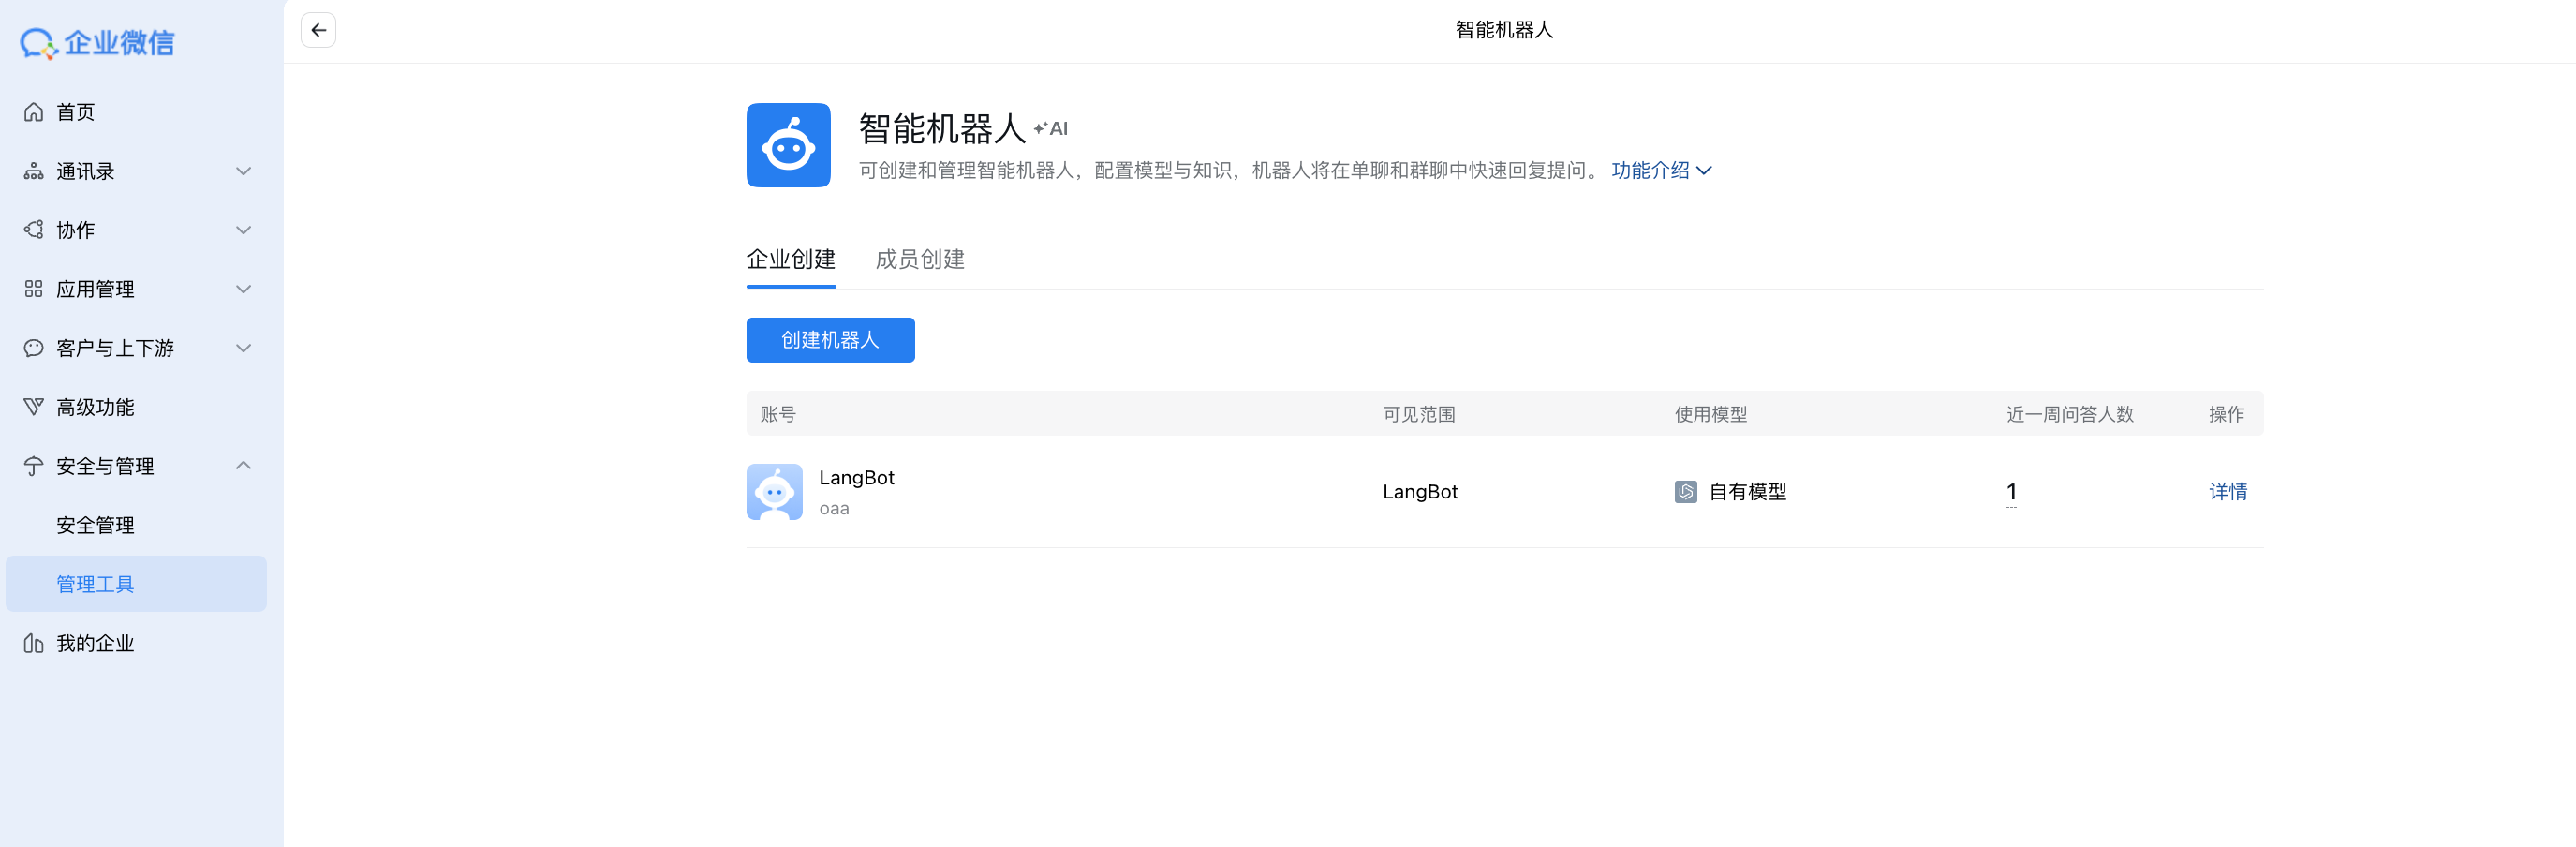 Click `Create Bot` and select `Manual Creation`, scroll to the bottom of the page, click `Create via API Mode`, and enter the page:
 ### Long Connection Configuration
#### Enable Long Connection API Mode
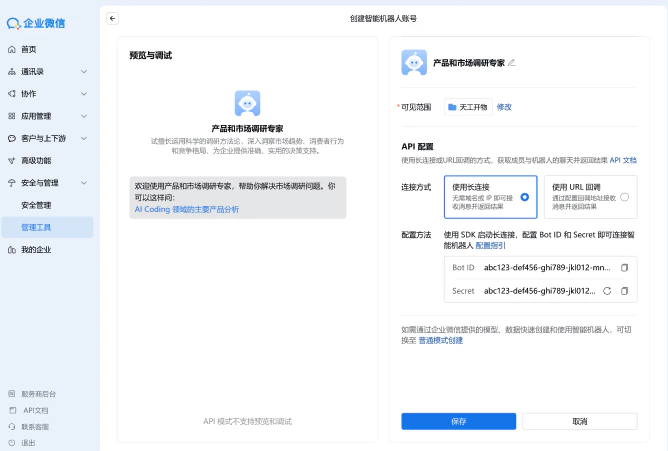
In the WeCom Admin Console, go to the Intelligent Bot configuration page, enable "API Mode" and select "Long Connection":
### Long Connection Configuration
#### Enable Long Connection API Mode
In the WeCom Admin Console, go to the Intelligent Bot configuration page, enable "API Mode" and select "Long Connection":
 #### Obtaining Credentials
After enabling the Long Connection API mode, you need to obtain the following credentials to establish the connection:
| Credential | Description |
| ---------- | ---------------------------------------------------------------------- |
| BotID | The unique identifier of the intelligent bot, used to identify the bot |
| Secret | The dedicated key for long connections, used for identity verification |
Note:
* The Secret is a dedicated key for long connections, which is different from the Token/EncodingAESKey used in the callback URL mode
* Please keep the Secret safe and avoid leaking it
* Mode switching impact: API mode can only use one method (long connection or callback URL). Switching to "Callback URL" mode will invalidate existing long connections; conversely, switching from "Callback URL" to "Long Connection" mode will make the original callback URL no longer effective
#### Configuring the Bot
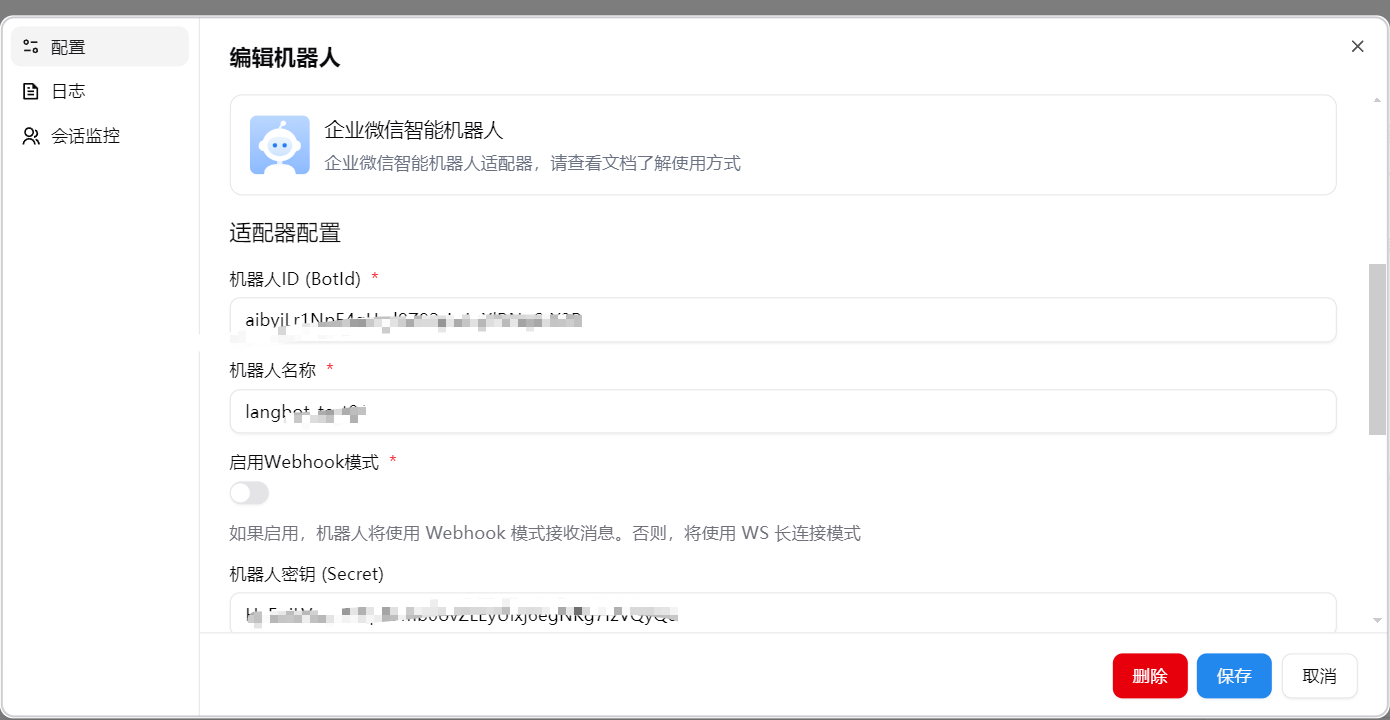
Start the LangBot main program, select the adapter `WeCom Intelligent Bot`, and fill in the configuration items.
Enter the BotID, Secret, and bot name from the long connection into the fields, click save and enable.
> The bot name must match the name of the newly created bot, otherwise the bot will not respond in group chats.
#### Obtaining Credentials
After enabling the Long Connection API mode, you need to obtain the following credentials to establish the connection:
| Credential | Description |
| ---------- | ---------------------------------------------------------------------- |
| BotID | The unique identifier of the intelligent bot, used to identify the bot |
| Secret | The dedicated key for long connections, used for identity verification |
Note:
* The Secret is a dedicated key for long connections, which is different from the Token/EncodingAESKey used in the callback URL mode
* Please keep the Secret safe and avoid leaking it
* Mode switching impact: API mode can only use one method (long connection or callback URL). Switching to "Callback URL" mode will invalidate existing long connections; conversely, switching from "Callback URL" to "Long Connection" mode will make the original callback URL no longer effective
#### Configuring the Bot
Start the LangBot main program, select the adapter `WeCom Intelligent Bot`, and fill in the configuration items.
Enter the BotID, Secret, and bot name from the long connection into the fields, click save and enable.
> The bot name must match the name of the newly created bot, otherwise the bot will not respond in group chats.
 ### URL Callback Configuration
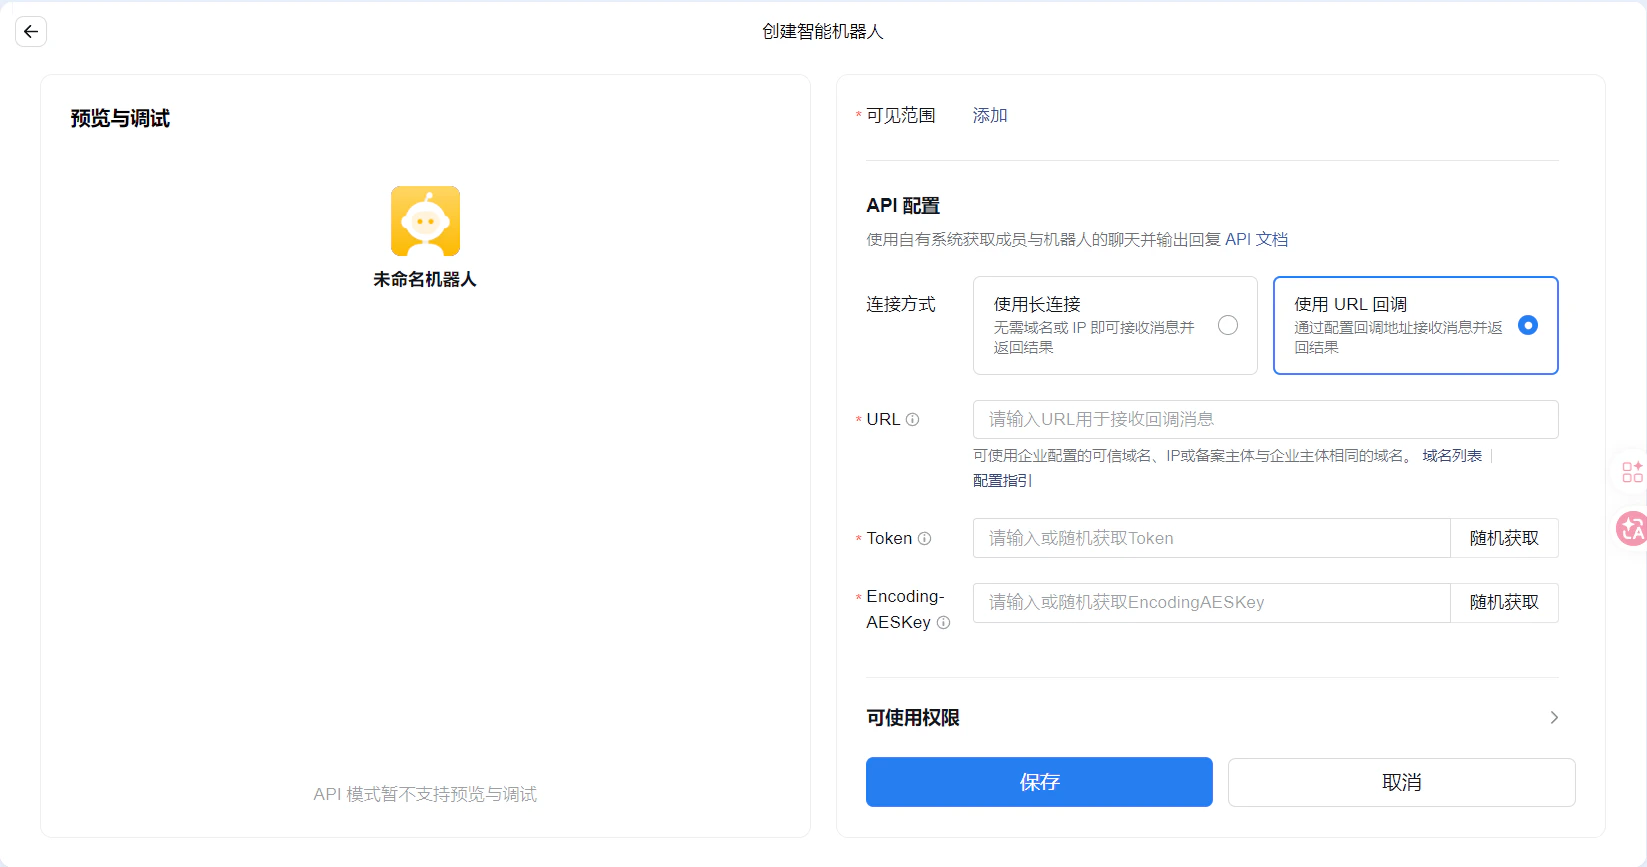
Click to randomly generate Token and EncodingAESKey, then fill in the basic bot information above. **Pay attention to setting the visibility scope**.
### URL Callback Configuration
Click to randomly generate Token and EncodingAESKey, then fill in the basic bot information above. **Pay attention to setting the visibility scope**.
 Click `My Company` in the left sidebar and save the Company ID at the bottom.
#### Configuring Callback URL
Start the LangBot main program, select the adapter `WeCom Intelligent Bot`, and fill in the configuration items.\
Among them, the token is Token, the Encoding-AESKey is EncodingAESKey, and the Bot ID can be filled in as xxx (or filled in randomly, it will be changed later). After filling in, click\
`Save`, and `Enable` the robot.
Click `My Company` in the left sidebar and save the Company ID at the bottom.
#### Configuring Callback URL
Start the LangBot main program, select the adapter `WeCom Intelligent Bot`, and fill in the configuration items.\
Among them, the token is Token, the Encoding-AESKey is EncodingAESKey, and the Bot ID can be filled in as xxx (or filled in randomly, it will be changed later). After filling in, click\
`Save`, and `Enable` the robot.
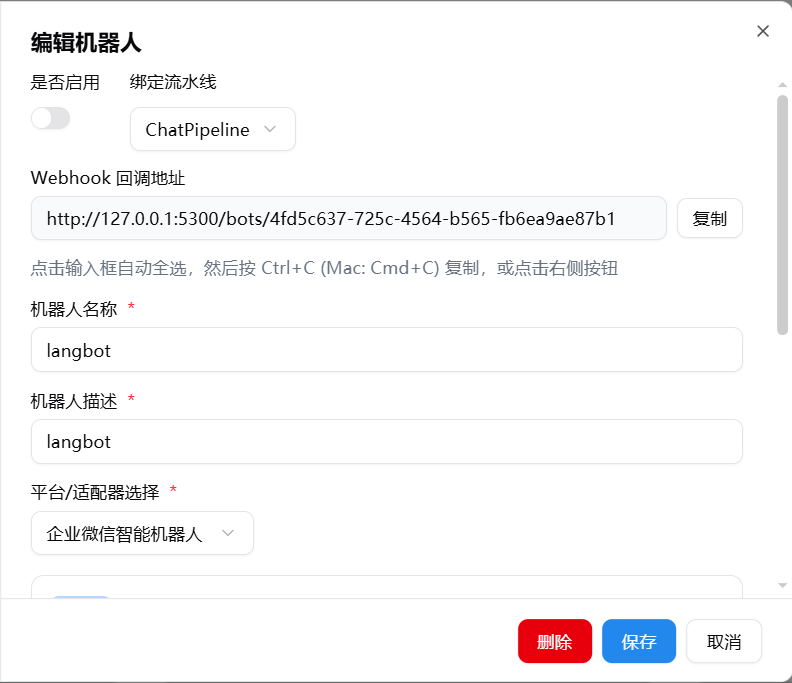
 On the LangBot homepage, enable and select the corresponding bot, click to enter the configuration page, copy the Webhook callback address
We recommend that you first refer to [Configure HTTP Reverse Proxy](/en/workshop/production/proxy-and-ssl) to configure the LangBot callback address.
On the LangBot homepage, enable and select the corresponding bot, click to enter the configuration page, copy the Webhook callback address
We recommend that you first refer to [Configure HTTP Reverse Proxy](/en/workshop/production/proxy-and-ssl) to configure the LangBot callback address.
 Return to the WeCom robot configuration page and fill the copied webhook address into `URL Callback`. If the creation is successful, it will jump to the details page. If the message `Request URL Failed` appears, please double-check whether the above steps have been completed one by one.
Details page after successful creation:\\
Return to the WeCom robot configuration page and fill the copied webhook address into `URL Callback`. If the creation is successful, it will jump to the details page. If the message `Request URL Failed` appears, please double-check whether the above steps have been completed one by one.
Details page after successful creation:\\
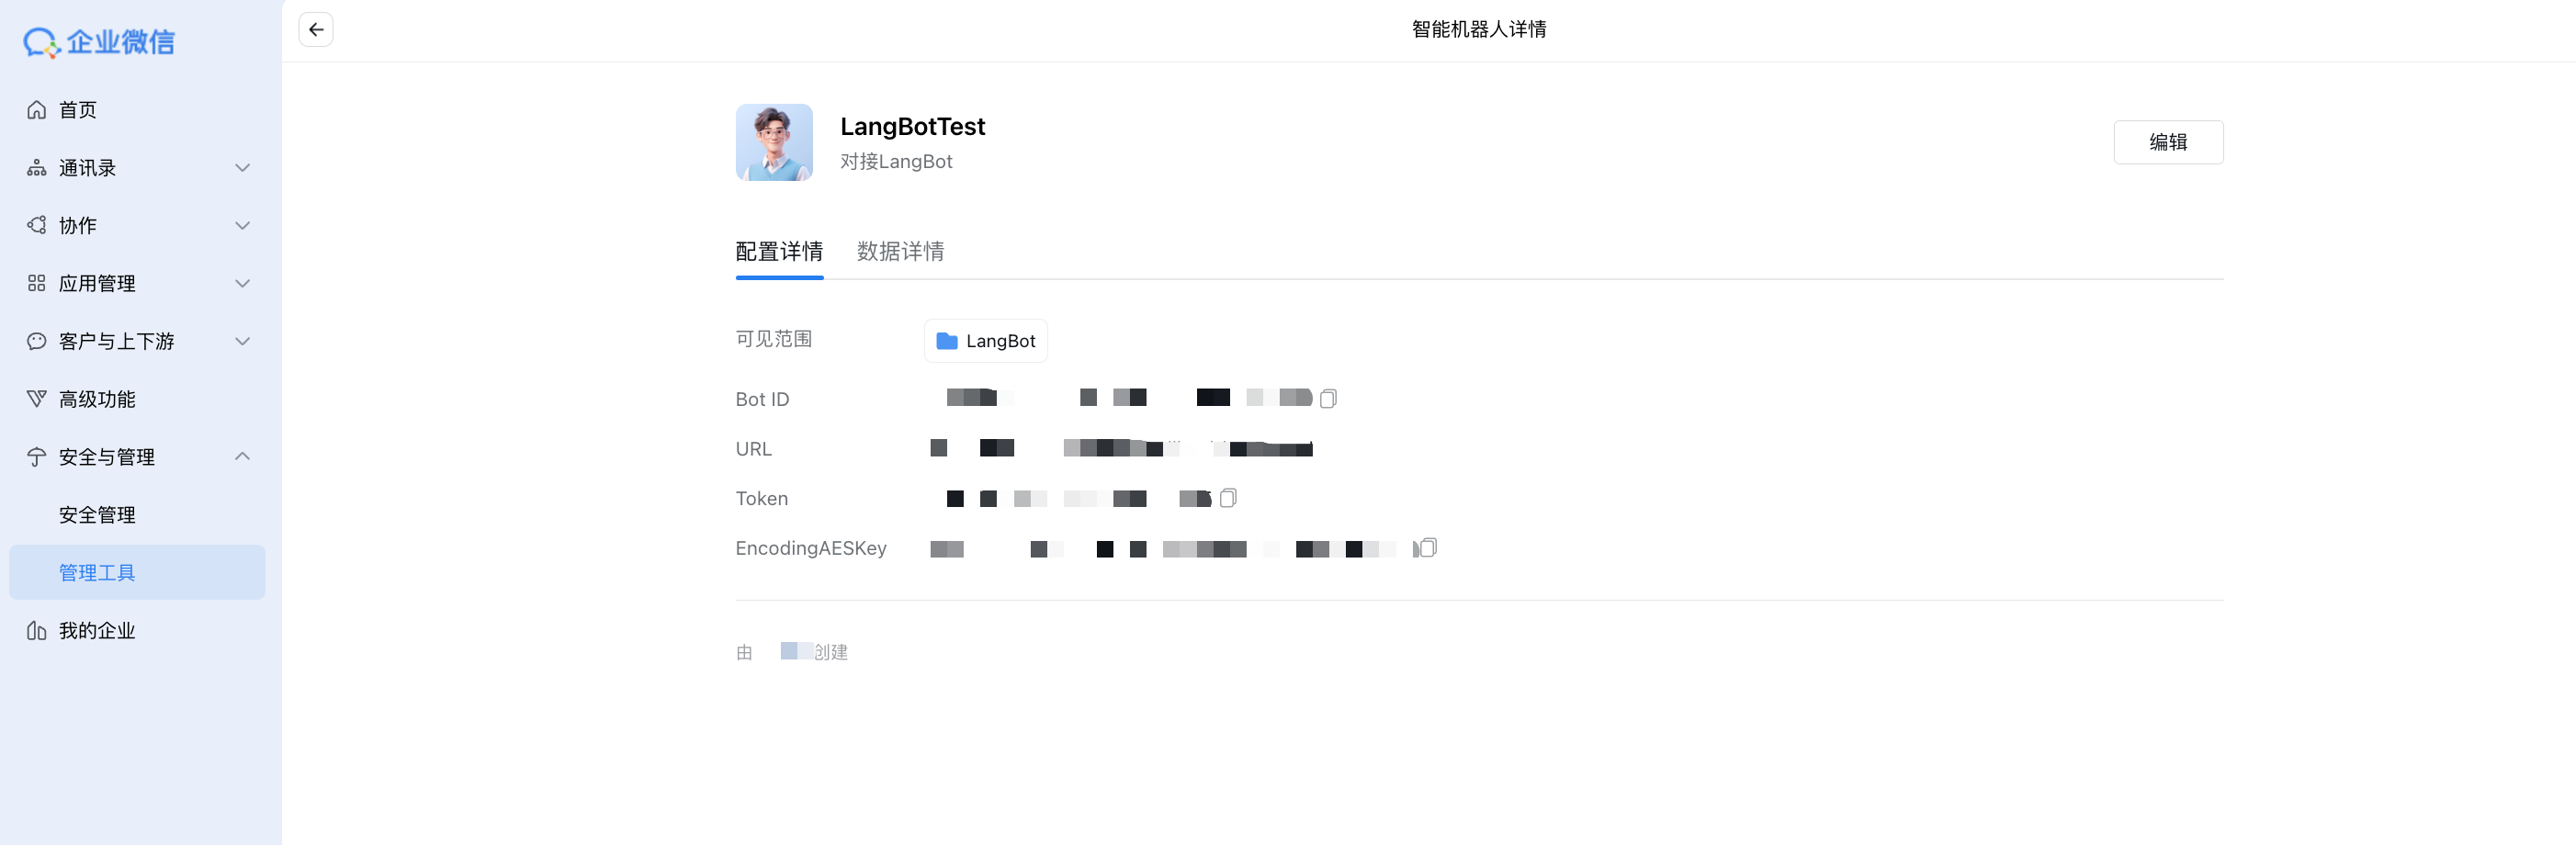 Copy the `Bot ID` and bot name from the WeCom robot details page, return to the LangBot management page, change the Bot ID of the deployed intelligent robot to the copied ID, fill in the bot name, and restart the robot.
### Enable Streaming
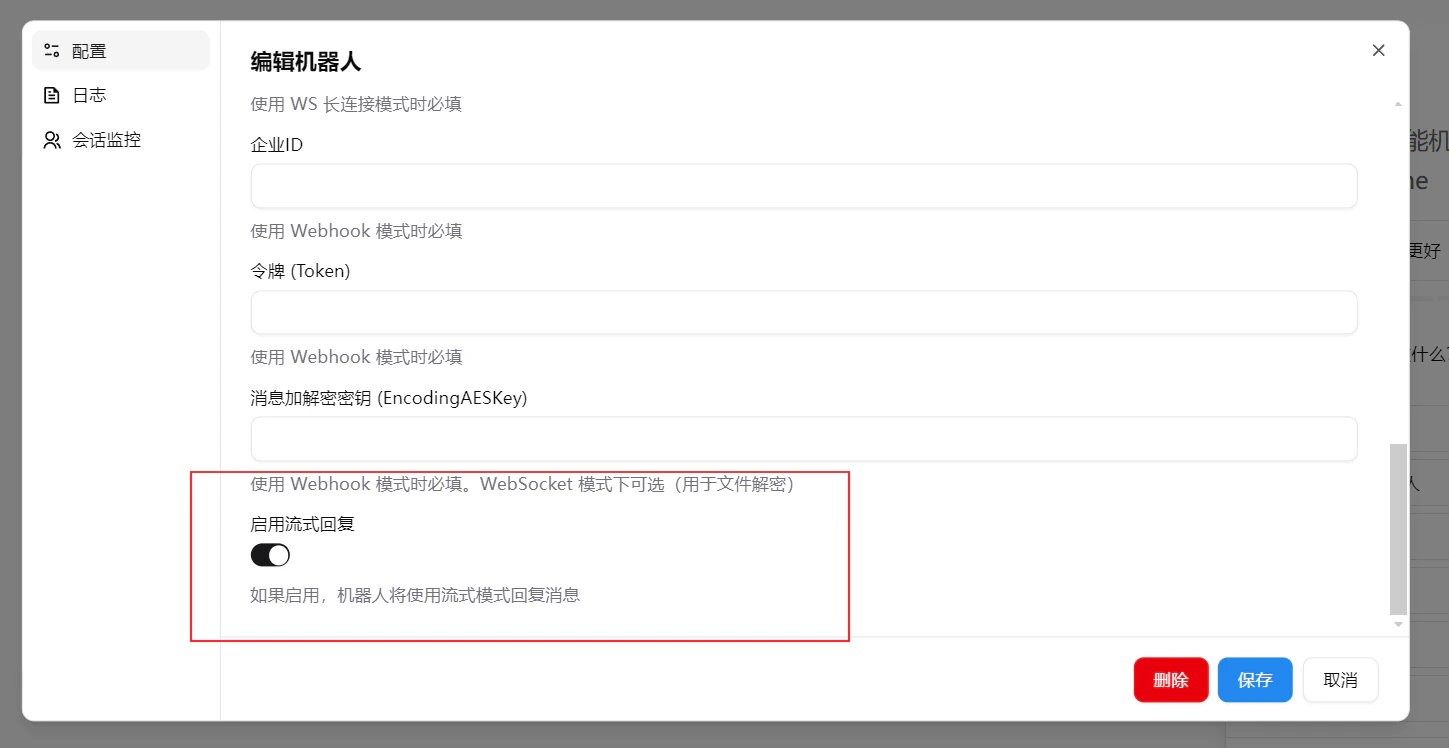
A streaming toggle has been added for locally deployed models or models that do not support streaming.
Copy the `Bot ID` and bot name from the WeCom robot details page, return to the LangBot management page, change the Bot ID of the deployed intelligent robot to the copied ID, fill in the bot name, and restart the robot.
### Enable Streaming
A streaming toggle has been added for locally deployed models or models that do not support streaming.
 ### Start Using
Enter WeCom, click `➕`, as shown:
### Start Using
Enter WeCom, click `➕`, as shown:
 Click `Company-Created`, select the created bot, and enter the chat interface.
Similarly, if you want to invite the bot to a group chat, click the add member button in the group chat and add the bot from there.
### Effect Images
Click `Company-Created`, select the created bot, and enter the chat interface.
Similarly, if you want to invite the bot to a group chat, click the add member button in the group chat and add the bot from there.
### Effect Images